Setup Far-Range Projectile Unit Attack
In the previous part, we configured a unit entity to have a Unit Attack component that allows it to launch a close-range attack without the use of projectiles. In this part, we will go through setting up a far-range attack that relies on a projectile, also known as an attack object.
1. Create Attack Object
To create a new attack object, open the RTS Engine top bar menu and click on New Attack Object.
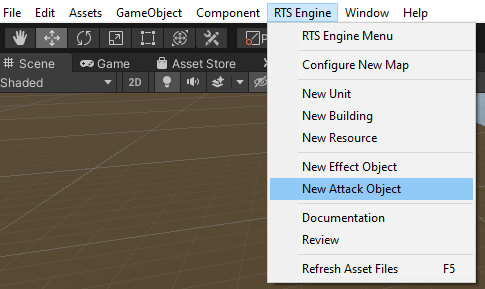
This would create a new attack object instance in the current scene, usually under the name of new_attack_object(Clone). Call it tutorial_attack_object then drag and drop it into the Project tab within a path that ends with ''../Resources/Prefabs' to make a prefab out of it and open the prefab.
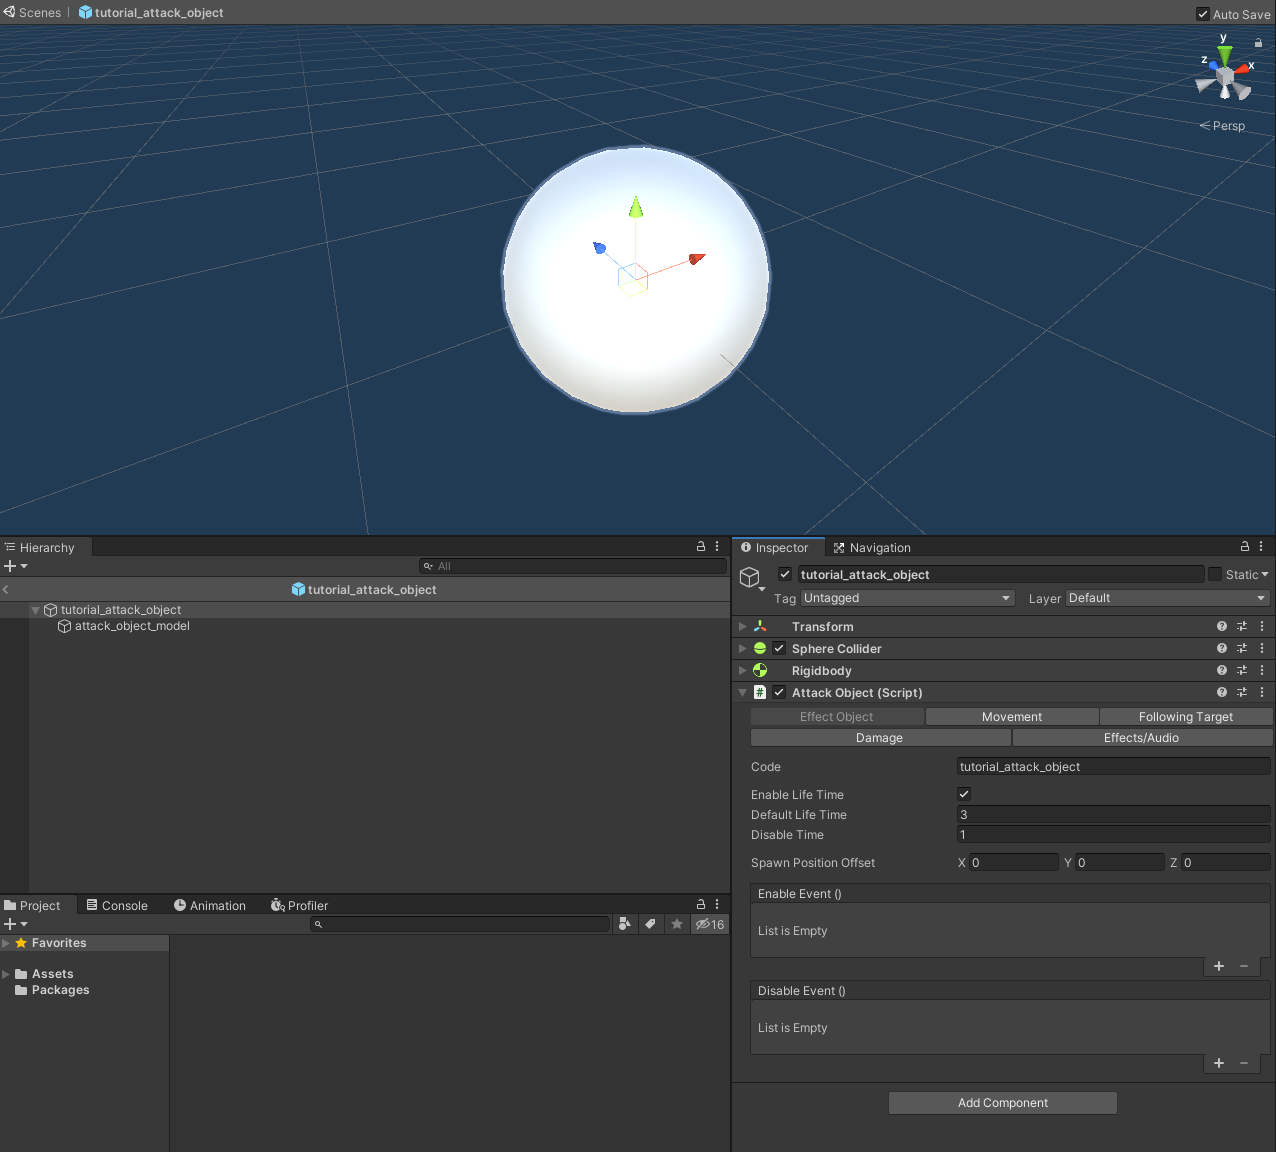
An attack object is required to have a Collider and a Rigidbody required to detect collisions with enemy faction entities to deal damage to them.
First make sure that the prefab's scale is set to (0.1, 0.1, 0.1) and now let's add a simple arrow model to represent the attack object. Our far-range based attack is going to be using an arrow for the projectile. From the demo files, search for the arrow_model in the project tab and drag it into the prefab as a child object and remove the default sphere model. Next extend the Collider component and make sure that it has Is Trigger enabled and have it positioned near the tip of the arrow. In the Rigidbody component, make sure that Use Gravity is disabled and that Is Kinematic is enabled.
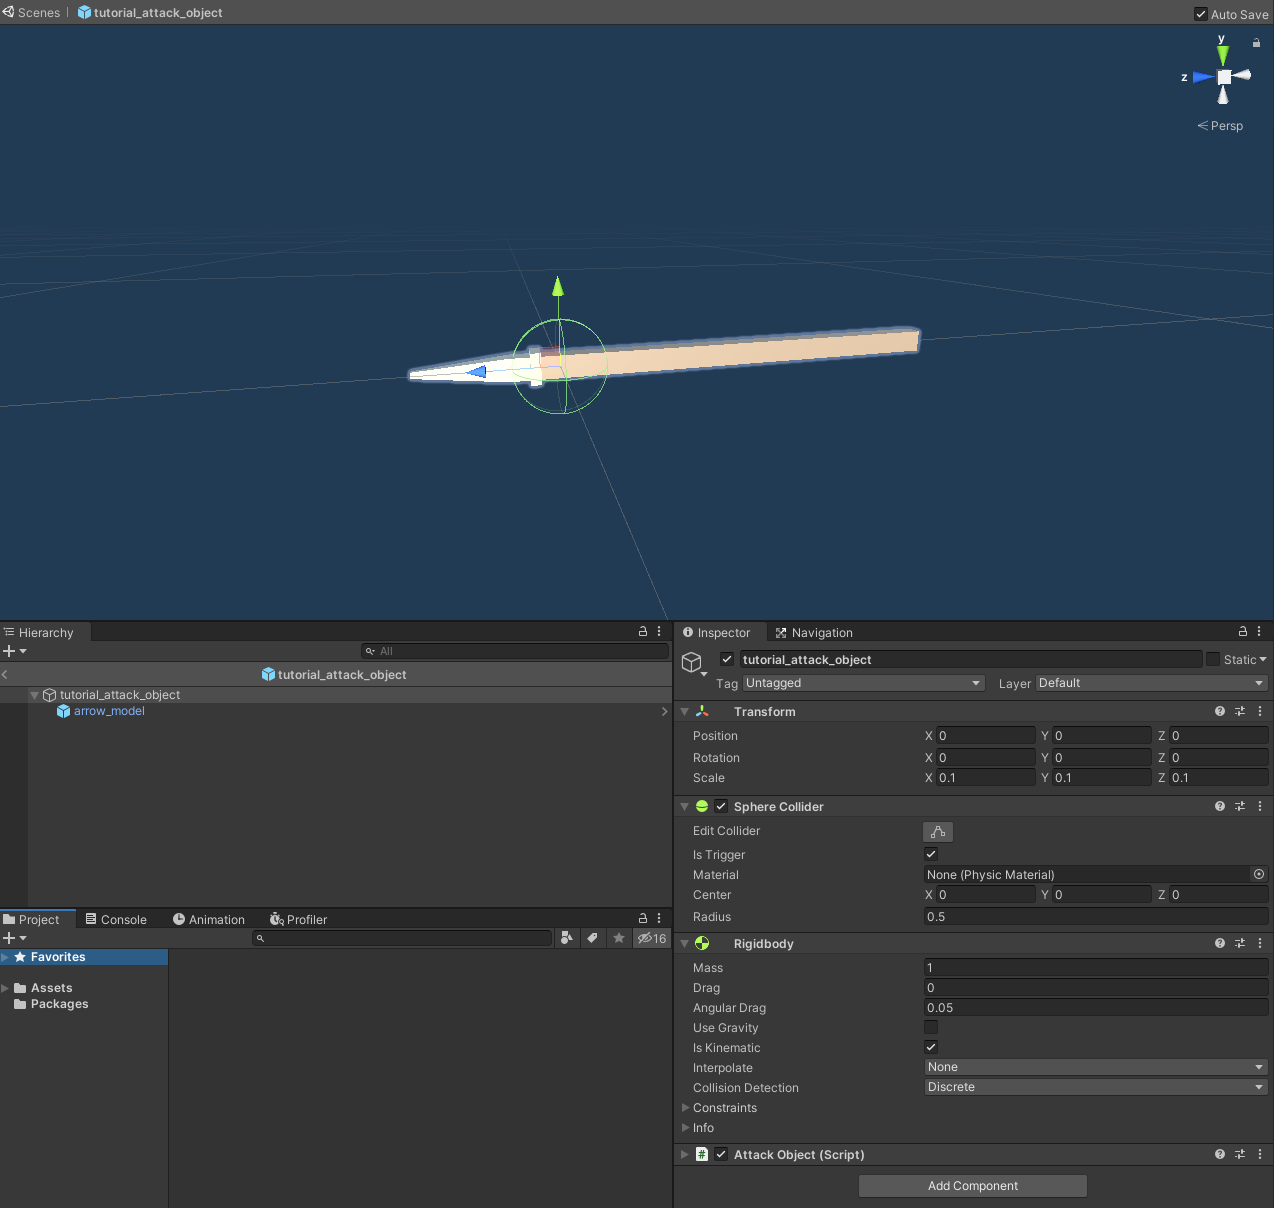
The main component is the Attack Object component.
1.1 Effect Object Tab
The Attack Object component extends the Effect Object component so that attack objects can use the base features from an effect object such as the life time configurations and be included in the object pooling setup for effect objects.
- Code: Each attack object must have a unique code that identifies it. For example, we can use tutorial_attack_object.
- Life Time: An attack object has a life time that can be set in the Default Life Time field (we can leave it as 3 seconds in this case). So that the life time duration is taken into account, make sure that the Enable Life Time field is enabled, else the attack object will never de-spawn and be added to the objects pool for it to be used again when required. Additionally set the Disable Time field to 1 to allow the attack object to remain for one second more when it is deactivated (either its life time is through or it has dealt damage to an enemy faction entity). When the attack object is deactivated, it is stationary and does not move.
- Spawn Position Offset: When the attack object is spawned, by an attack component for example, it spawns at a certain position chosen by the component that spawned it. This field allows to define values to offset the X, Y and Z position axis on spawn.
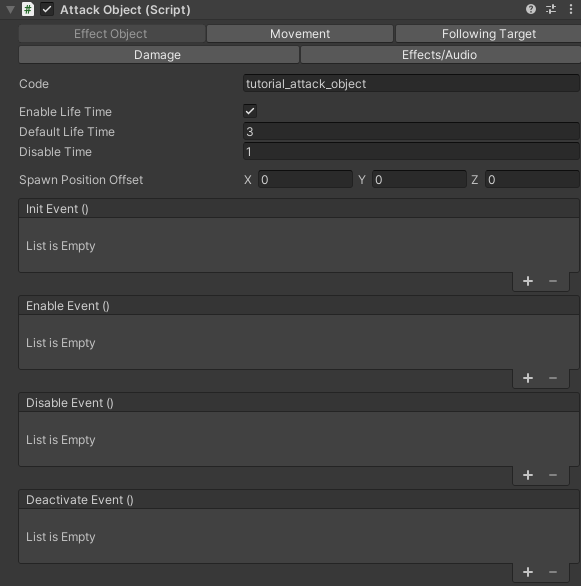
- Events: They allow for custom behavior through the logic you construct in your own components.
- Init Event: Called once when the effect object is first created and initialized.
- Enable Event: Called every time the effect object is enabled (spawend).
- Disable Event: Called every time the effect object is disabled (de-spawned). Disable time value has been set to the Disable Time.
- Deactivate Event: Called every time the effect object has disabled and the disable timer is through.
1.2 Movement Tab
The movement of an attack object is dictated using a curve. An attack object spawns at the position that its creator component chose (for example, the arrow would spawn on the tutorial_unit''s bow) and that is the starting point. The attack object is then directed at a destination point (usually the position that an enemy faction entity was or is still at when the attack object is launched). With a movement curve, you can update the height of the attack object when it is going through from the starting to the destination point and beyond. The attack object allows to setup two movement curves alongside conditions to determine which one to use. In this example, we want to setup the projectile to move through a parabola (going up and then down while moving) if the distance between the attacker and its target is more than 5. Else, we want to use a regular straight line for the movement curve with no height modifications throughout its lifetime.
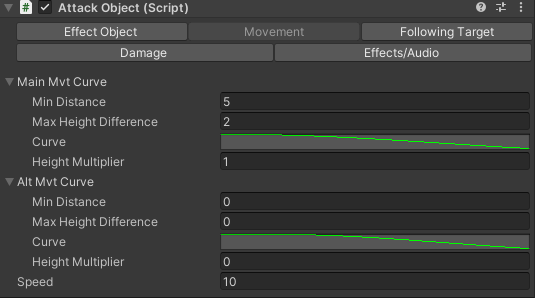
Main Mvt Curve: This is the main movement curve that sets the position of the attack object during its life time.
- Min Distance: If the distance between the starting and destination points is larger than the value in this field then the main movement curve can not qualify to be used. Set this to 5.
- Max Height Difference: If the difference in the position on the Y axis (height) between the starting and destination points is larger than the value in this field then the main movement curve can is not used. Set this value to 2.
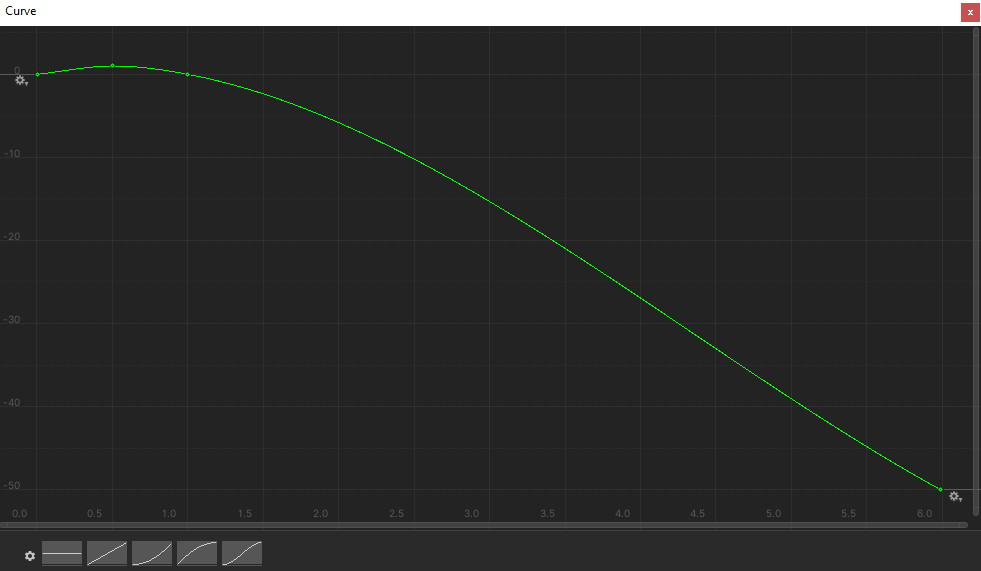
- Curve: The x-axis represents the progress that the attack object makes through its movement from the starting position it is created at at 0.0 then at the destination position it is moving towards at 1.0 and then beyond the destination position yet still in the same direction and that is at > 1.0. In the curve below, I've set the following points:
- (0.0, 0.0): Starting position
- (0.5, 1.0): Top of the parabola in the middle of the starting position and destination position.
- (1.0, 0.0): Destination position, a y value of 0 means that the attack object is expected to land exactly at the destination position.
- (6.0, -50.0): Beyond the destination position, we want the arrow to continue going down until it is deactivated.
- Height Multiplier: This value is multiplied to the height of the attack object during its movement in its lifetime. For this example, we will keep it set to 1.
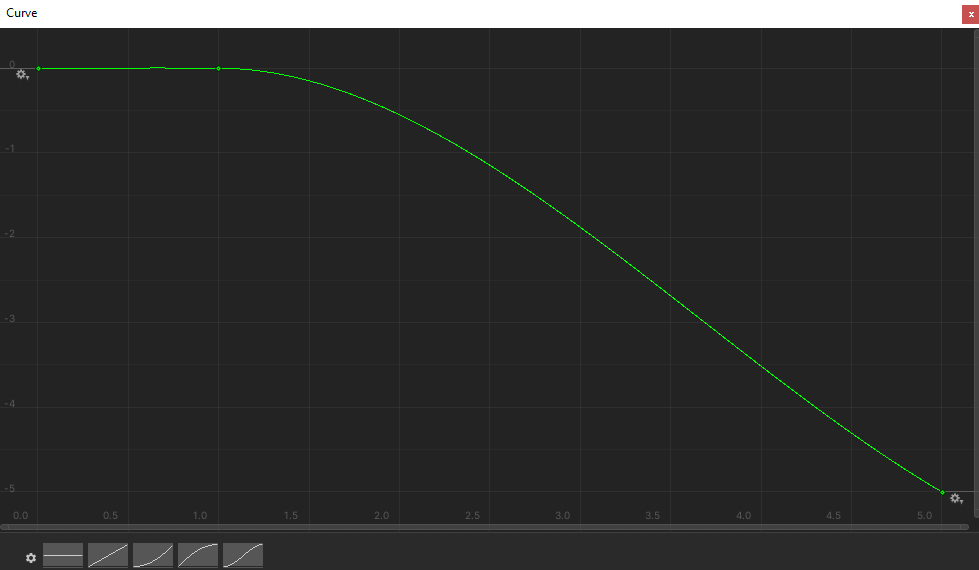
Alt Mvt Cruve: This is the alternative movement curve that is used when the main curve use conditions are not met. It uses the same data structure as the above field. Leave the Min Distance and Max Height Difference as conditional fields are irrelevant here. Set the Height Multiplier to 0 and the curve as the following to guarantee a straight trajectory for the arrow in its secondary movement.
- (0.0, 0.0) for the starting position.
- (1.0, 0.0) for the point at the top of the parabola between the start and destination position.
- (5.0, -5.0) for the destination position to make sure that the arrow starts slowly falling down after it reaches its destination position.
Speed: The movement speed determines how fast the attack object will be moving during its lifetime and is valid for both the main and alternative movement curves.
1.3 Following Target Tab

- Follow Target: When enabled, the attack object will not just move towards its destination position that was chosen at the time the attack object is created but will keep track of the target faction entity it was launched at by following it until it deals damage or its lifetime is through. Keep this option disabled in this case.
- Follow Target Max Distance: If the attack object can follow its target, this defines for how far it would before it stops.
1.4 Damage Tab
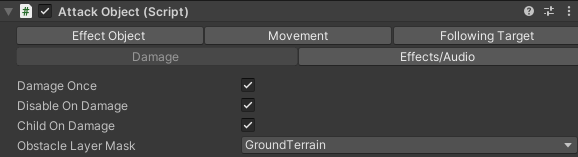
- Damage Once: Enable to make the attack object deal damage only to the first enemy faction entity it collides with.
- Disable On Damage: Enable to deactivate the attack object as soon as it deals damage to a target even if its life time is still running.
- Child On Damage: When enabled, the attack object becomes a child of its target when it deals damage to it. We want to allow the arrow to remain on the faction entity that it hits during the disabling time (which we set to 1 in the Effect Object tab above), therefore enable this field.
- Obstacle: You can define layers of objects that will be considered as obstacles to the attack object. An obstacle object collision is treated the same way as a target faction entity collision but without dealing any damage. In this case, we used the default Obstacle layer as well as the GroundTerrain layer to indicate that the terrain and any other object marked with the default obstacle layer is one that would stop the attacking object from moving.
1.5 Effects/Audio

- Trigger Effect/Audio: The Trigger Effect allows to be assigned with an Effect Object to spawn when the attack object itself is spawned at its initial position. When Trigger Effect Face Target is enabled then the trigger effect will be rotated to face the target that the attack object is launched towards. The Trigger Audio field allows to play an audio clip when the attack object is spawned. Enabling the Trigger Effects Post Delay field means that the trigger effect and audio will only be invoked after a delay period is through. The delay period is set in the attack component which we will get to later.
- Hit Effect/Audio: The Hit Effect allows to be assigned with an Effect Object to spawn when the attack object enters in collision with a target. The Hit Audio field allows to play an audio clip on hit.
That is it for the attack object. We will now configure the attack component to make use of it.
2. Setup Attack Component
Open the tutorial_unit prefab and navigate to its unit_attack child object. Copy the Unit Attack component and paste it as new on the same game object. Make sure the old unit_attack component is not active anymore (disable the Is Active field) and that only the newly added one is active. For configurations, in the General Tab, update the following:
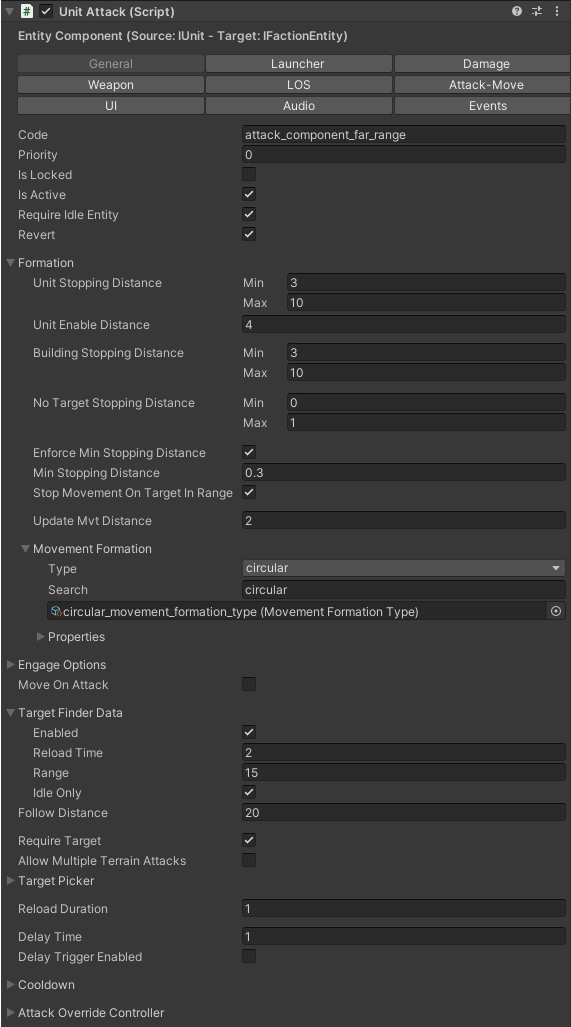
- Code: Choose a new code such as attack_component_far_range.
- Formation:
- Update the Unit Stopping Distance and Building Stopping Distance ranges to (3, 10) for both. This is what makes the attack far-range. Set the Unit Enable Distance to 4
- Enable the Enforce Min Stopping Distance field and set the Min Stopping Distance to 0.3. This allows the unit to always make sure that it is at least 0.3 away from its target before shooting. This ensures that the arrow will not be shot through a target entity that is so close that collision will not be detected.
- Target Finder Data: Increase the Range field value to 15.
- Follow Distance: Increase the value to 20.
- Reload Duration: Increase the value to 1.
- Attack Override Controller: For this far-range attack, we can use the archer's override controller from the demo files. Search for archer_animator_controller in the project view and drag it into this field.
Now move to the Launcher Tab to configure the attack objects.
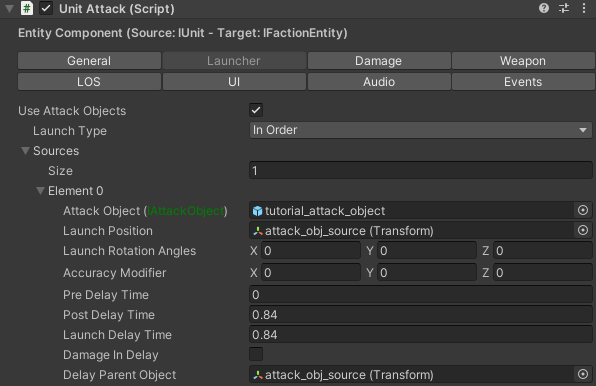
The launcher allows to launch one or multiple attack objects towards a target within one attack iteration. Each attack object to launch must have an element defined for it in the Sources array field. The Launch Type field decides what to make of the attack objects defined and how or in which order to launch them. You have the following launch options:

- Random: In each attack iteration, only one attack object source will be chosen randomly and used for that iteration.
- In Order: In each attack iteration, all the attack object sources will be used consecutively in the order they have been defined at in the Sources array field. This is useful when you have multiple attack objects sources and you have delays for each source before the next one launches to construct a complex attack launch.
- Simultaneous: In each iteration, all the attack object sources will all be launched at the same time.
Since we are only dealing with one attack object source in this case then it does not matter which launch type we pick.
Now add a new element to the Sources array field and set the following fields:
- Attack Object: Drag and drop the tutorial_attack_object into this field.
- Launch Position: This is the transform that defines the starting point from which the attack object will be launched. If you are using the demo archer model for the tutorial_unit entity then you can find a launch position under the name of attack_object_source as a child object of the unit's model.
- Launch Rotation Angles: Defines the rotation of the attack object when it is launched. We want to have the same rotation as the one set in the attack object's prefab which is (0,0,0).
- Accuracy Modifier: This field allows to alter the accuracy of the attack object's movement by altering the target position by sampling from this field. Keep this field value as (0,0,0) to not introduce any inaccuracies in the direction of the arrow.
- Pre Delay Time: Delay time before the attack object is created. Leave at 0.
- Post Delay Time: Delay time after the attack object is created. Set as 0.84. This time is used to disallow the next attack object source from being immediately launched in case the Launch Type is assigned to In Order.
- Launch Delay Time: Delay time that starts exactly when the attack object is created, is handled by the Attack Object component, and is used to block the movement of the attack object. Assign to 0.84 as we want the tutorial_unit to perform a bit of its attacking animation before it sends the arrow.
- Damage In Delay: While the attack object is still in delay mode, having this field disables prevents it from doing damage until it exists the delay mode.
- Delay Parent Object: While the attack object is still in delay mode, it can have a parent object so that its position is still synced with the attacker. The same transform used as the Launch Position can be used for this field.
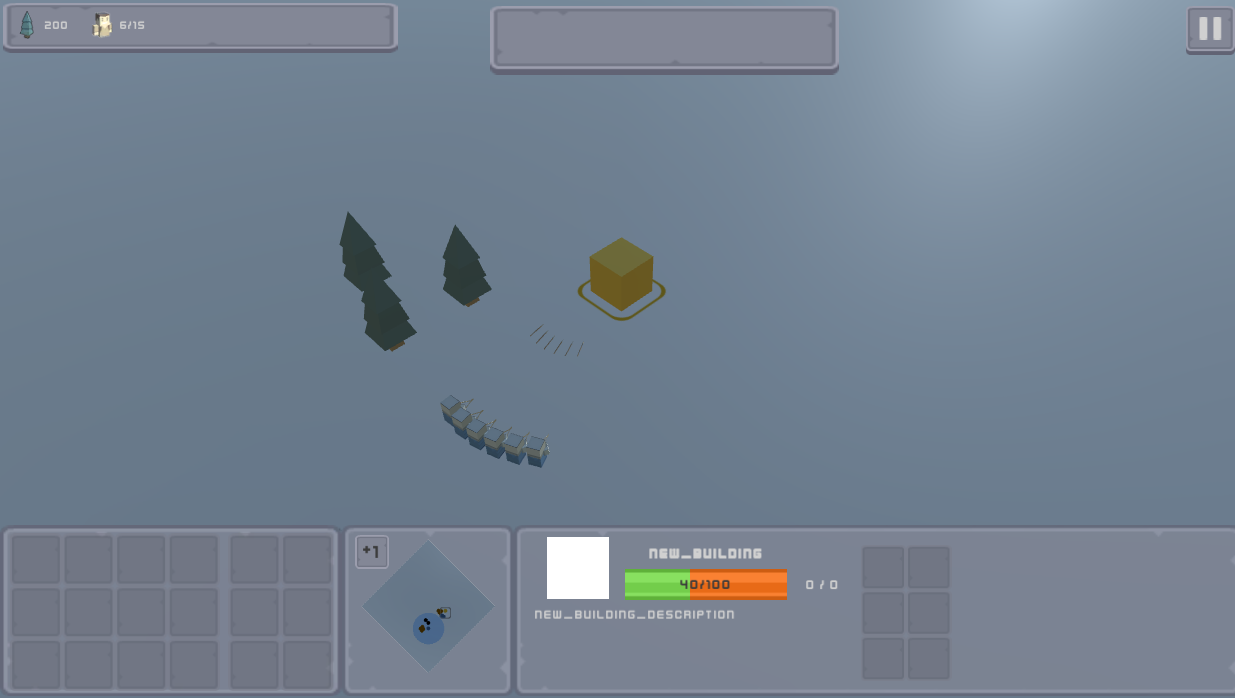
3. Testing
Load the tutorial_map scene and start it. Select the tutorial_unit instances and command them to attack an enemy entity. You would see that now the units are standing within a further distance than they did with their first close-range attack and that they shoot arrows that damage target faction entities with the arrows sticking on the target's object for a second before they are hidden to be added to the object pool for them to be used again.
Download Files
You can download the results of this tutorial here.