Advanced Building Placement Module
Provides advanced systems for building placement such as grid placement and segmentation placement (allowing for placing walls).
Features
Grid placement:
- Enable buildings to be placed in a grid on the map.
- Define the area that each building occupies.
- Define visual indicators and markers for local player faction placement by showing the status of the cells of the building to place area as well as the cells surrounding it.
Segmentation Placement:
- Place segments of a building type allowing for placing walls on the map.
- Customize segment placement by defining special buildings types to use in the first or last segment as well as a special building that will replace segments periodically.
- Place segments on the grid or freely in the map depending on what is enabled.
- Allow segments to snap into already existing buildings, limiting the possible direction and rotation that the segments will take.
- Support for placing walls such as converting a wall segment into a gate that can open/close, allowing units to move to the other side of the wall segments.
Faction Entity Seller: An entity component that allows a faction to sell a unit or a building and get resources for it. The component also works on buildings that are yet to be completely constructed for the first time, allowing to cancel building placement.
Demo
Requirements
- RTS Engine 2022.2.2 or higher
Installation
Get it from the Advanced Building Placement Module and import it into your project.
Guide
In this guide, we will setup a new map scene with advanced building placement features. The same steps are also valid when configuring your map scenes.
Create a new scene and click on Configure New Map from the RTS Engine top bar menu. Then setup the lightning settings for the new scene and bake a new navigation mesh and save the new map scene. In this example scene, we will remove the default building and configure the player faction slot accordingly. Keep the default unit instance and add a Builder component to it.
1. Map Scene Configuration
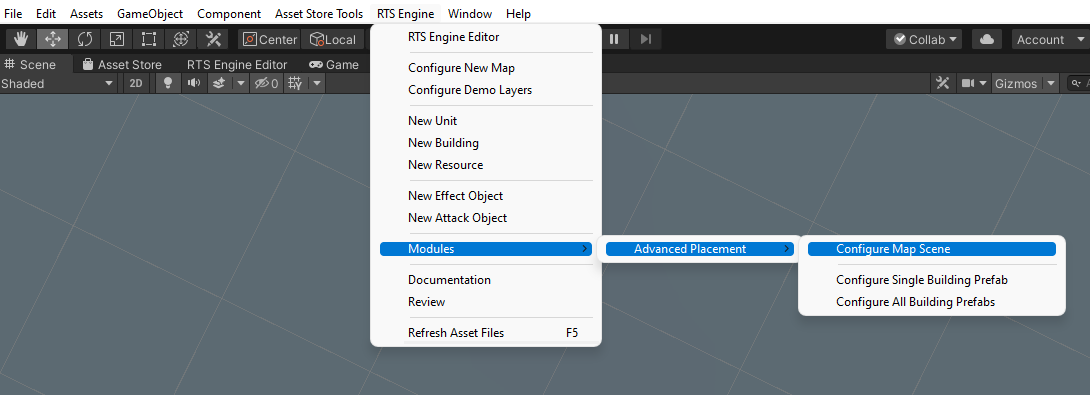
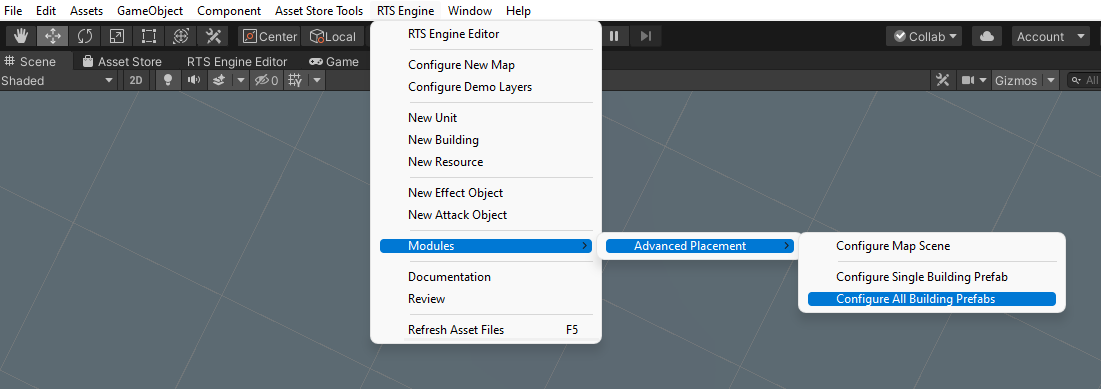
In the RTS Engine top bar menu, find Modules -> Advanced Placement and click on Configure Map Scene.
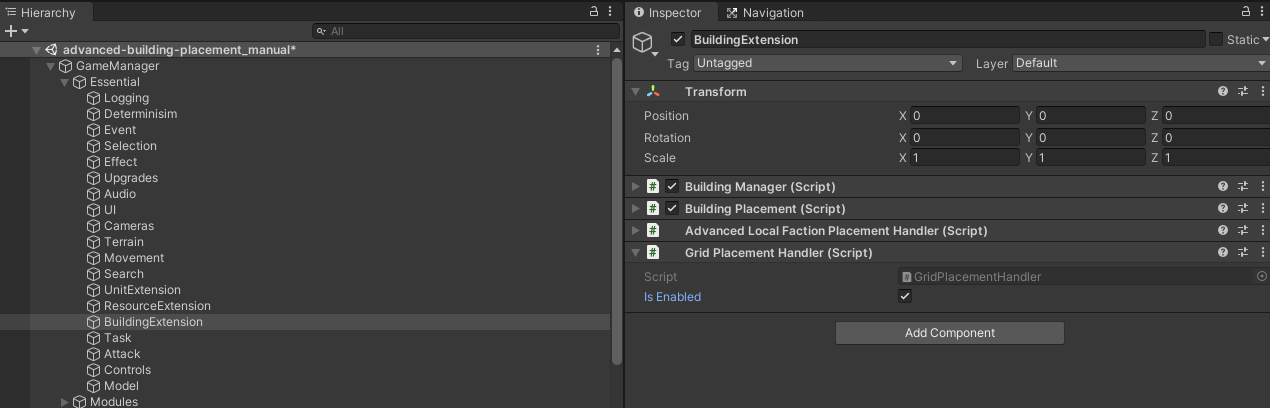
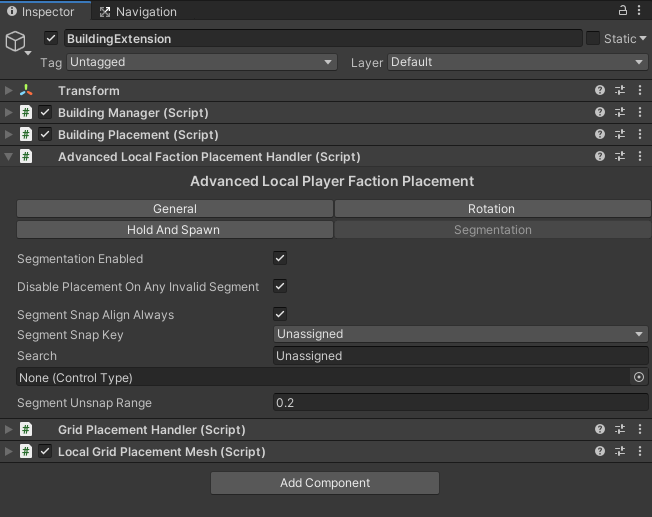
Now find the BuildingExtension game object in the hierarchy under GameManager -> Essential, select it and you will see that the Advanced Local Faction Placement Handler component has been added to it while the default local player faction placement fields in the Building Placement inspector are now hidden out where all the matching fields' values have been copied to the new independent advanced placement handler component (all fields are the General, Rotation, Hold And Spawn tabs).
And that is it for the map scene configuration.
2. Building Prefab Configuration
In this section, we will create a new building prefab and configure it to work with advanced placement.
Open the RTS Engine Editor window from the RTS Engine top bar menu, navigate to Buildings and click on Create New Building
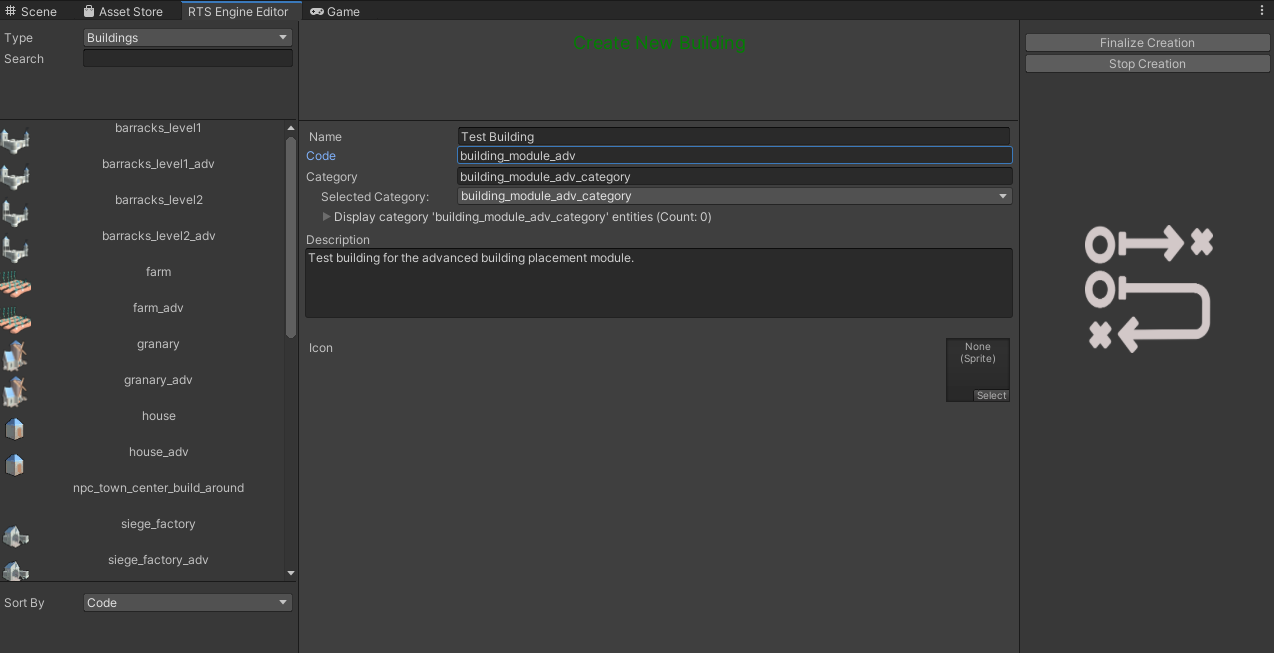
Give the new building type a unique code and input the other properties then hit Finalize Creation.
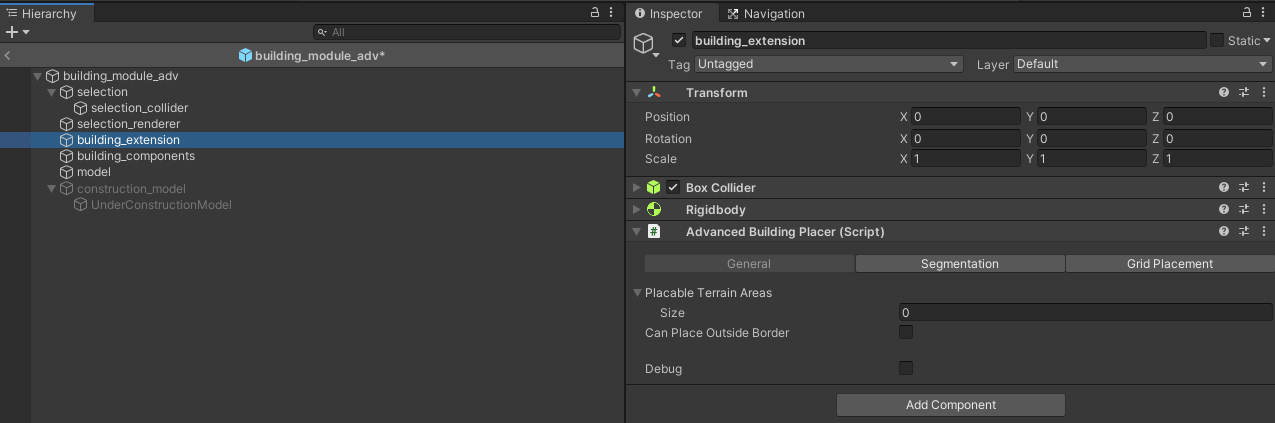
The building will then be created in the project tab path of Resources/Prefabs. Open the new prefab find the building_extension child object where the default Building Placer component is attached.

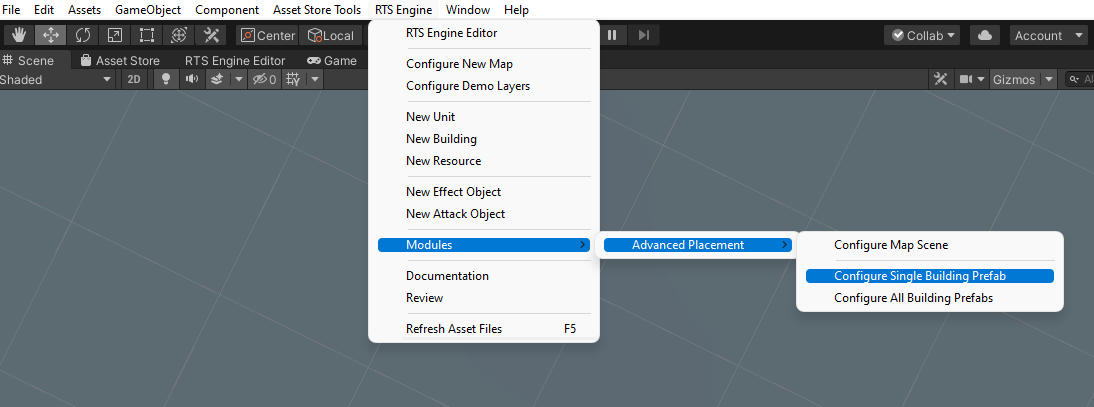
In the RTS Engine top bar menu, navigate to Modules -> Advanced Placement -> Configure Single Building Prefab.
This removes the default Building Placer from the open building prefab and replaces it with the Advanced Building Placer component and sets the shared fields from the older placer component to the new one.
Finally save the building prefab. You can repeat this same process for your other building prefabs to make them work with this module. Or you can update all building prefabs in your project at once by picking the Configure All Building Prefabs option from the RTS Engine top bar menu.
3. Grid Placement
3.1 Configure Map Scene
In this section, we will enable grid placement on a map scene. In the map scene, find the game object that has the Building Placement component attached to it, which should be in the following hierarchy path: GameManager -> Essential -> BuildingExtension. Add the Grid Placement Handler component to it to enable grid placement (also make sure that the Is Enabled field is enabled).
3.2 Configure Building Prefab
Now open the building prefab and navigate to the Advanced Local Faction Placement Handler inspector, under the Grid Placement tab.
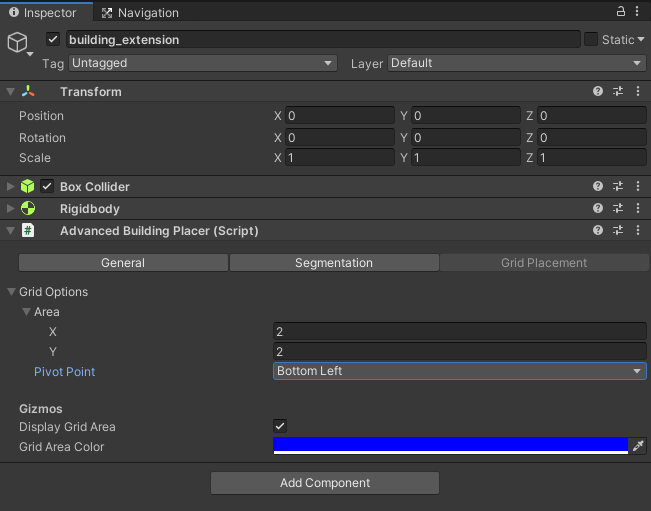
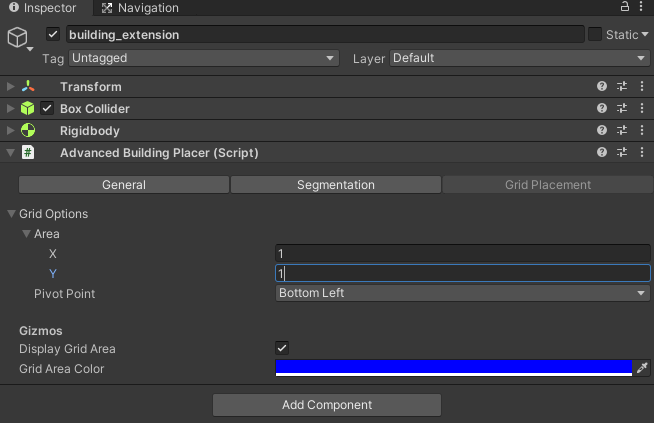
Configure the Grid Options field which includes the Area of cells that the building would occupy and then the Pivot Point which determines which corner (or center) that the building's position placement position would follow in regards to the player's moving mouse position. In this example, the building would occupy an area of 4x4 and the pivot point is set to Bottom Left.
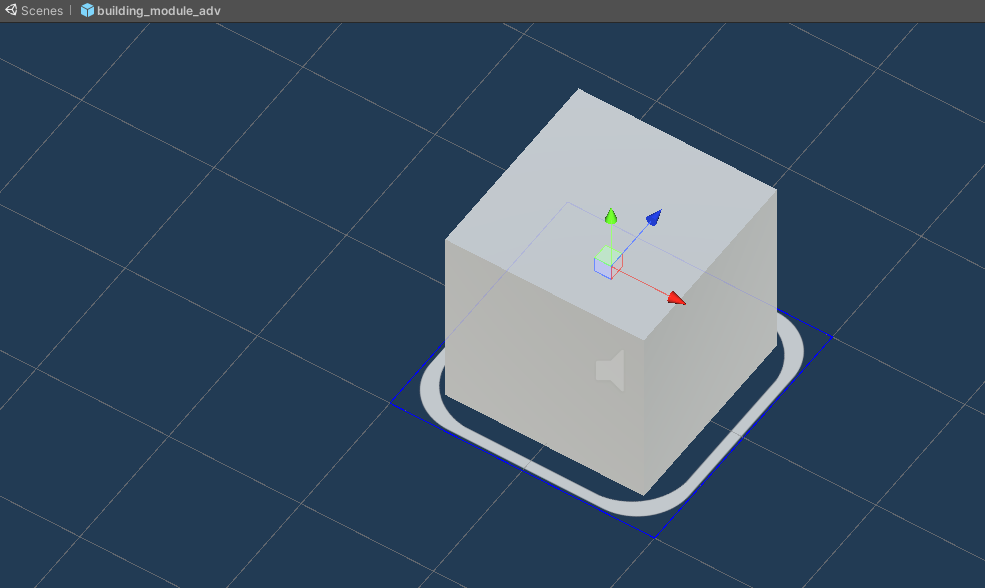
The Gizmo fields underneath allow to display the area that the building would occupy in the grid in the scene view, which is represented by the blue rectangle shown in this example.
Additionally, if you are following this tutorial and have created a new building type like the steps above describe, make sure that the building can be placed outside of border since we do not have a building with a Border component in the map scene.
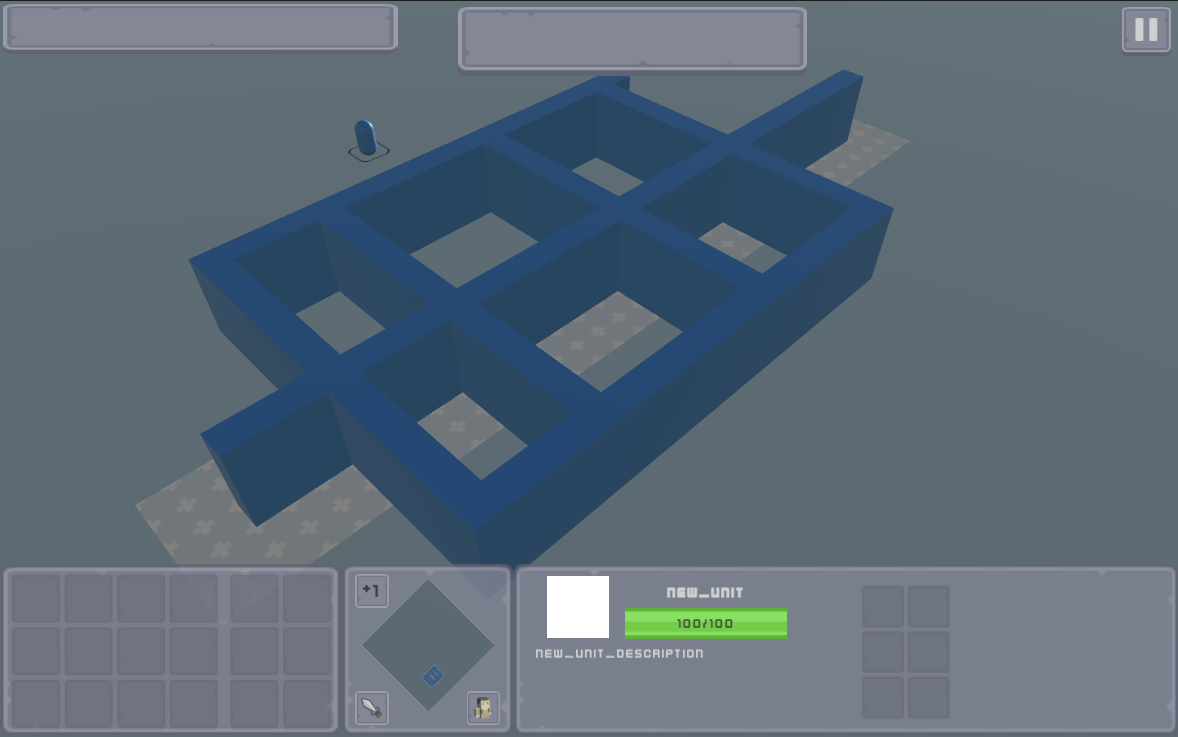
Make sure to define a placement task for the building in a unit in the scene, launch the scene, select the builder and create the new building.
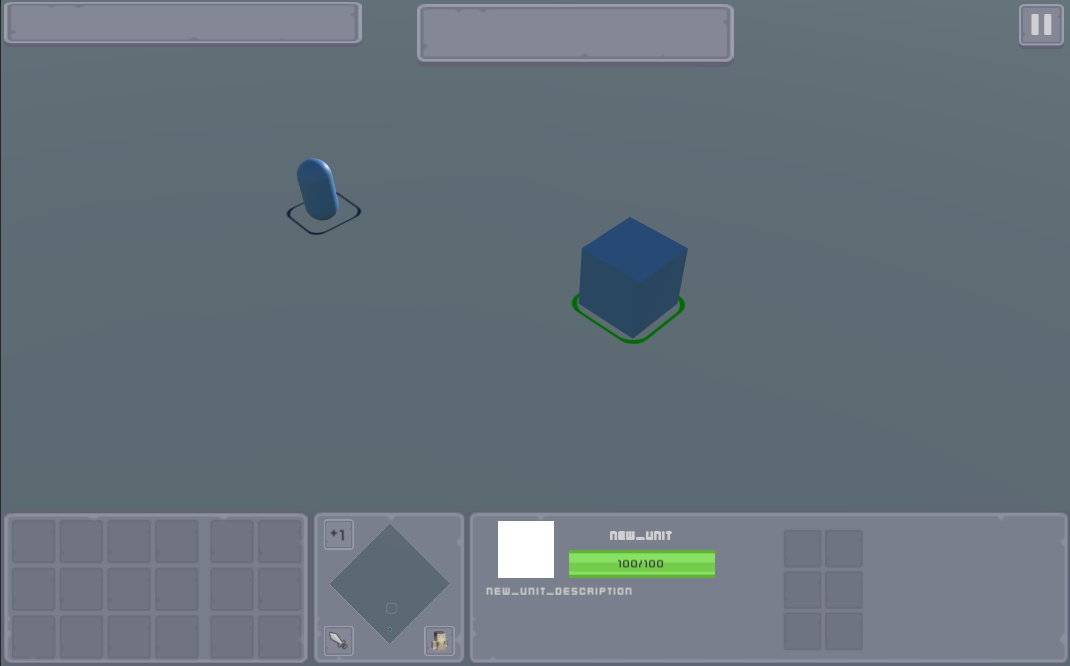
Notice how the building is now following the mouse position and sets it as its bottom left corner position which is because we chose Bottom Left as a the Pivot Point for the building. The building also snaps to the cells (that have a size of 1) when moving the mouse position.
3.3 Add Grid Marker
Now we will add indicators that will appear for individual grid cells to show their status when a building is being actively placed in the map.
In the map scene, find the game object that has the Building Placement component attached to it, which should be in the following hierarchy path: GameManager -> Essential -> BuildingExtension. Add the Local Grid Placement Handler component to the same game object.
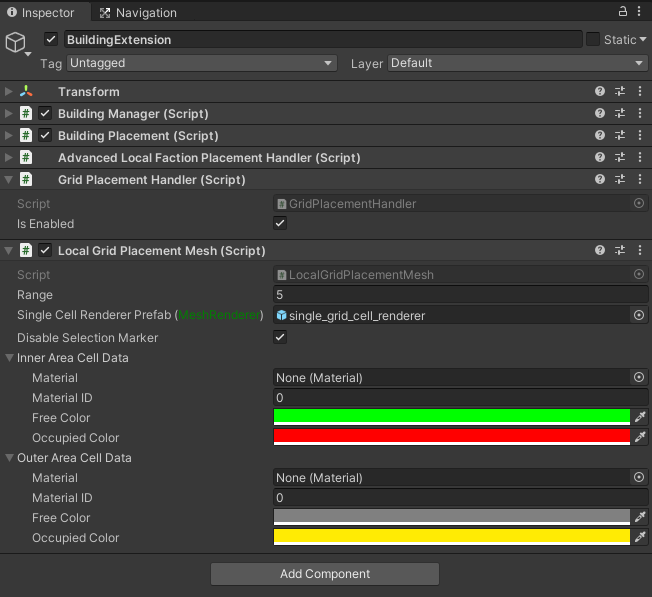
The latter component allows to render the status of cells in the area of a building in the process of placement as well as cells outside of that area within a specific range, which you can set in the Range field.
For the Single Cell Renderer Prefab, this prefab needs to have two components: Mesh Renderer and an Effect Object. The latter component allows the cell renderer to be pooled when not active. The size of this cell must fit the grid cell size (set to 1). You can use the example cell renderer which can be found in the project path: RTS Engine -> Modules -> AdvancedBuildingPlacement -> Prefabs under the name single_grid_cell_renderer:

You can disable showing the regular selection renderer on placement by enabling the Disable Selection Marker field and you can decide what material, free color (cell is unoccupied) and occupied color to use for the cell renderer when the cell is part of the building's area and when it is outside its area by modifying the Inner Area Cell Data and the Outer Area Cell Data.
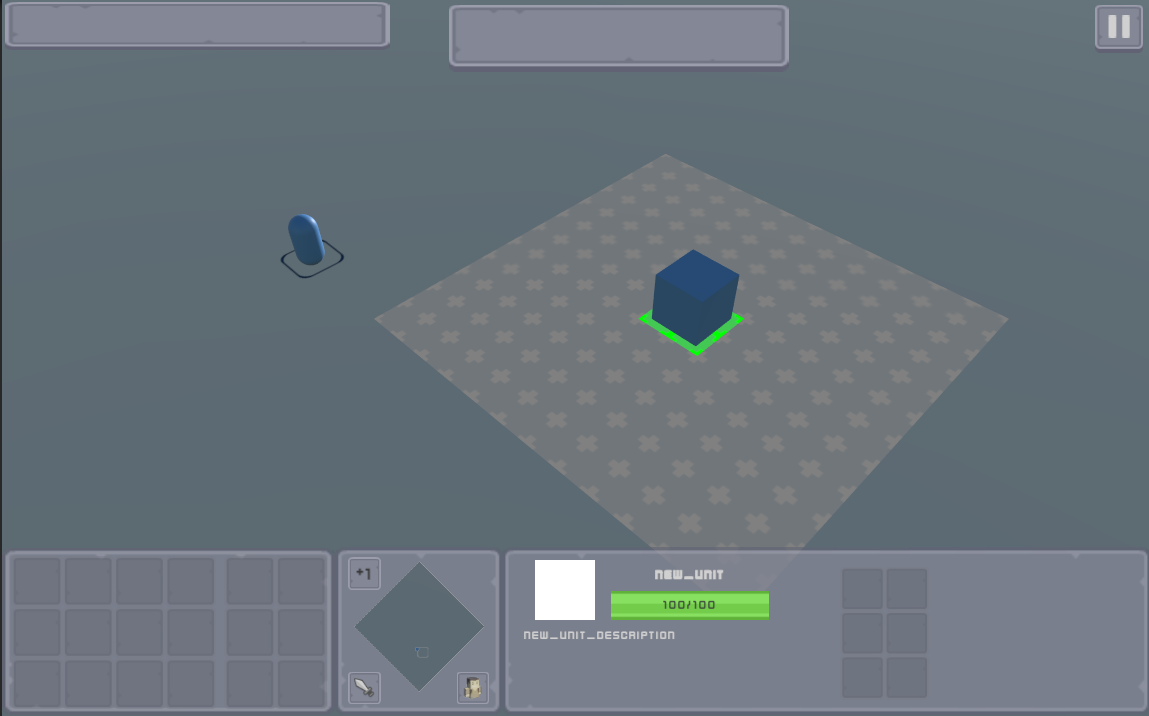
Now launch the map scene and try placing the same building again and you will see the renderers colored accordingly in placement mode:
4. Segmentation / Walls Placement
In this section, we will go through setting up segmentation place to be able to place walls.
When setting up a building to be part of a segmentation placement, please make sure that each segment has the following properties:
- Have the building segment's prefab Transform pivot point set to the center bottom of the building (just like the pivot point used on all building prefabs in the demo files).
- Make sure the building segment's scale is set to (1,1,1) and if you want to have a different segment length than 1, then update the scale of the children object which would include objects that hold colliders, the model and the selection renderer children objects.
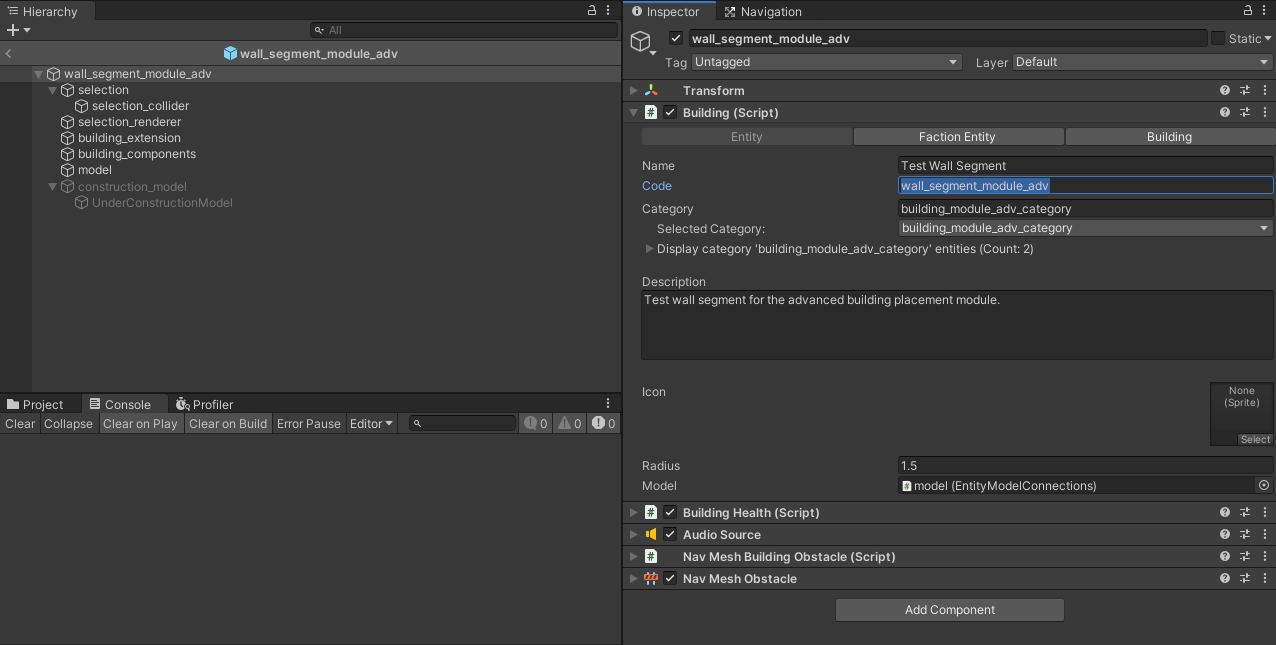
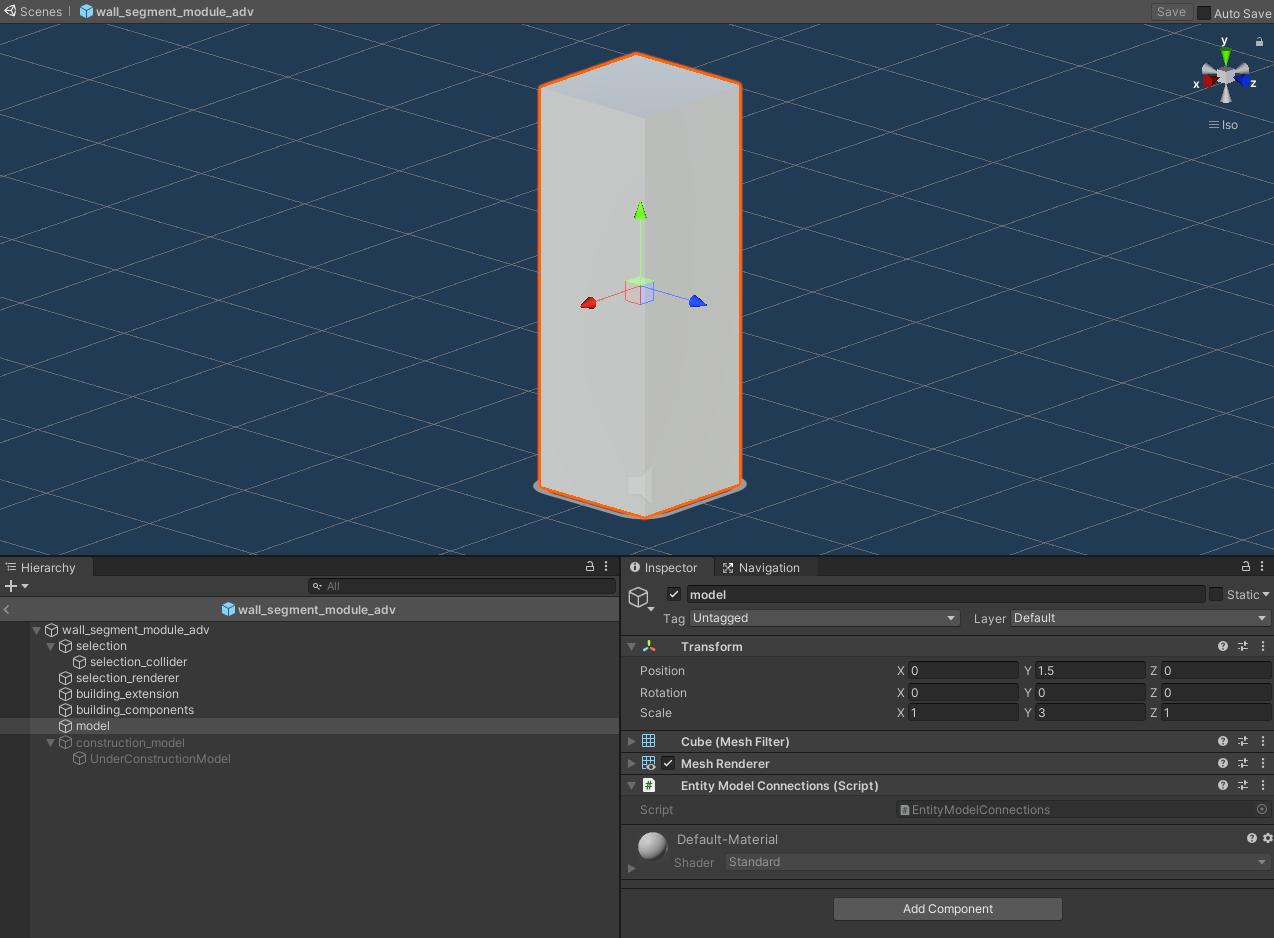
Create a new building type with a unique code to use as a single wall segment, for example, we will use this wall_segment_module_adv building prefab. In this prefab, I set the model object to have a position of (0,1.5,0) and its scale to (1,3,1). I have also modified the selection renderer to fit the new size of the model.
Now navigate to the building_extension child object, find the Advanced Local Faction Placement Handler component and open the Segmentation tab.
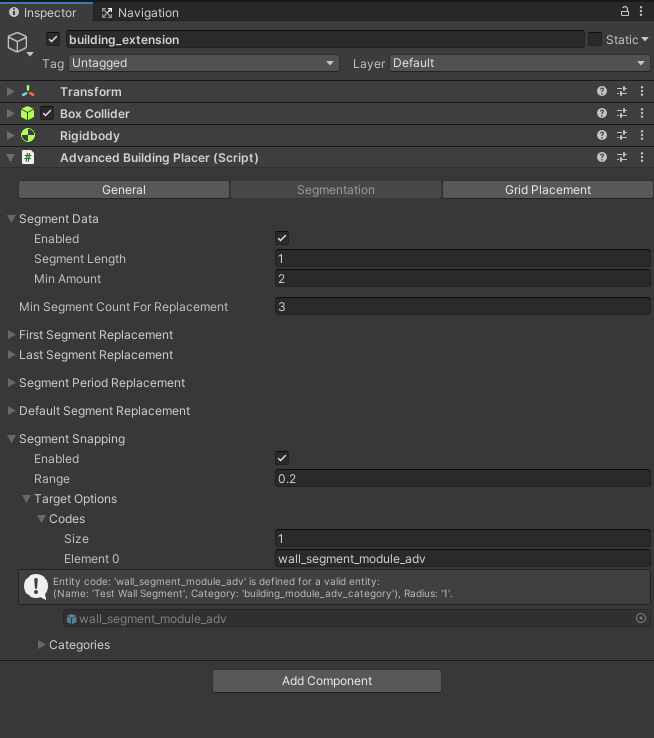
- Segment Data: Enable the segment data, set the Length to 1 (which matches the length assigned to the model) and set the Min Amount to 2. The latter field means that we can only place a minimum of 2 wall segments for the placement to be valid. The Length of the segment is only relevant in case the map scene does not have grid placement enabled, otherwise, the area of the building in the grid will be considered.
- Segment Snapping: Enable snapping to allow placement wall segments to snap into already placed building instances. Set to the Range to a small value such as 0.2 and set the Target Options to define entities that the wall segment can snap to. In this case, we want the wall segments to snap into other wall segments so we will define it as the sole target option using its code.
In the Grid Placement tab and in case grid placement is enabled in the map scene, make sure that the Area of the building is set to (1, 1), meaning that each wall segment will take up one cell in the grid, which matches the size of the model we set.
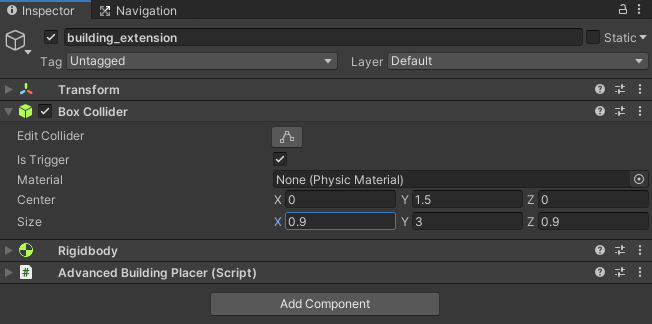
Finally, make sure that the collider attached to the building_extension has a size that is slightly smaller than the area the wall segment is supposed to take (one cell in this example). The reason is that wall segments will be placed next to each other (depending on the chosen grid area size or segment length) and if they have a collider that matches the size they are supposed to occupy then they will be colliding with one another, seeing one another as obstacles and therefore not allowing any segment to be placed. I have changed the collider size to (0.9, 3, 0.9).
Now set the builder unit to construct the wall segment building prefab, start the map and place the wall segments to make a wall. Hold down the left mouse button and drag it around the map to spawn more segments and make a wall.
In case of grid placement enabled, you will see that the wall segments can only be placed within lines that follow the grid. Otherwise, the walls can be placed in any direction. After placing a few segments, try placing a new wall that cuts through, starts from or ends at another wall segment to test for snapping.
Additional settings regarding segments and snapping can be found under the Segmentation tab in the Advanced Local Faction Placement Handler component inspector:
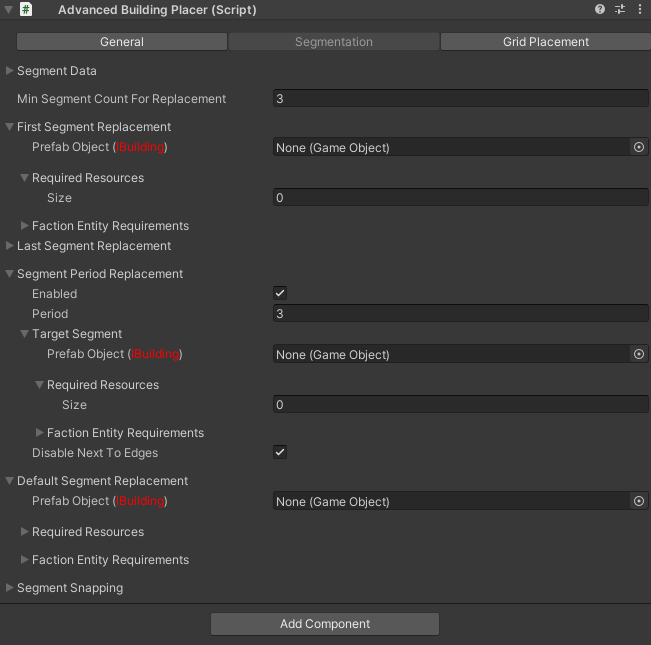
Otherwise, you can configure the segments to have different building types when modifying the First Segment Replacement, Last Segment Replacement, Segment Period Replacement and Default Segment Replacement fields in the Advanced Building Placer. Check the tooltips for more information on how that would work or checkout the examples in the demo scene which you can find under RTS Engine -> Modules -> Advanced Building Placement -> Demo -> Building Extension -> Resources -> Prefabs in the project tab where there is an example of a wall segment with replacements enabled and an example of a gate that can be enabled on any wall segment.
Changelog
v2022.2.2
Release Date: 06/21/2022
Requirements
- RTS Engine 2022.2.2 or higher
Changes:
- Initial Release
v2022.3.0
Release Date: 08/25/2022
Requirements
- RTS Engine 2022.3.0 or higher
Changes:
- REMOVE the Disable Placement On Any Invalid field from the General tab of the Advanced Local Player Faction Placement component inspector.
- FIX a bug with grid placement where rotating a building during placement did not update the grid cells in its area and its surroundings.
- UPDATE handling building placement failure errors with an appropriate player message for local player building placement.
v2022.3.1
Release Date: 12/25/2022
Requirements
- RTS Engine 2022.3.1 or higher
Changes:
- FIX a bug where the grid placement on a rotated placed building does not occupy the correct cells.
- FIX a bug with segment building placement where segments of different lengths are used.
- FIX a bug when using grid placement with segmentation and snapping the first segment of the wall to a new to-be-placed series of wall segments that messes up the spacing between the segment to be placed.
- FIX a bug where, in some cases, the amount of expected segments in segmentation placement keeps going from n to n+1 in each consecutive frame even when the local player is not moving their mouse when using segments with multiple lengths.
- UPDATE local player based segmentation placement to stop when the game is paused.
- UPDATE the "Min Segment Count For Replacement" to allow values starting from 0 (previously, it required a minimum of 2). When the value is set to 0, the temporary placement building instance that the player can drag through the map before starting the segmentation placement will be set to the first segment replacement instance in case it is set.
v2023.0.1
Release Date 06/27/2023
Requirements
- RTS Engine 2023.0.1 or higher
Changes:
- FIX a bug with placing multi sized building segments in the segmentation placement mode.