Setup New Map Scene
Make sure to have the RTS Engine asset imported in your project.
Go ahead and create a new scene, we'll refer to it as tutorial_map, and save it somewhere in your project.
0. Import Default Layers
If you just imported the asset for the first and while playing the demo scene, you are getting a bunch of layer-related errors.
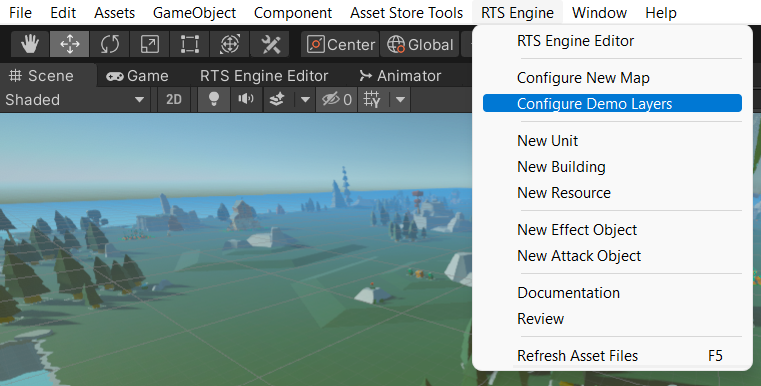
Make sure to import the preset layers. In the top menu bar in the editor, select RTS Engine -> Configure Demo Layers to import the demo layers.

1. Configure New Map
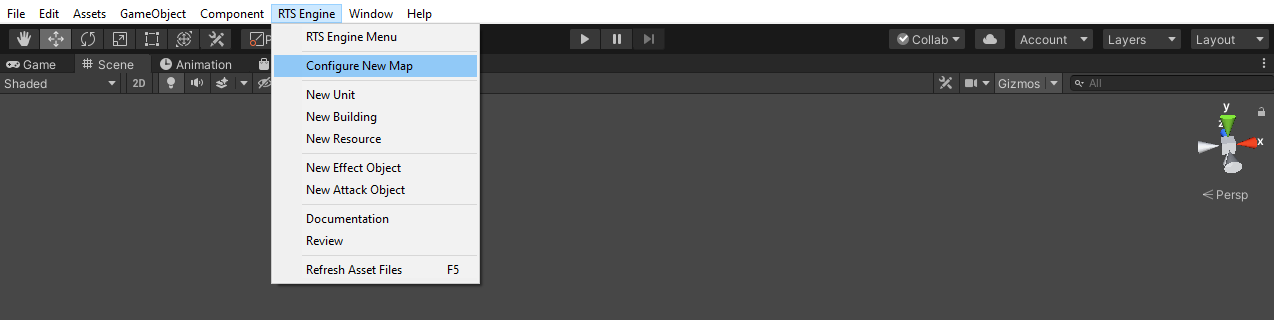
To import the RTS Engine components into the scene, click on the RTS Engine top bar dropdown menu and click on Configure New Map.
It would make sense at this stage to turn on auto-lighting generation for this scene in your Unity editor so the objects in the scene become more visible.
At this stage, you might want to have the scene light up for better visibility. From the Lighting window (Window -> Rendering -> Lighting), click on New Lighting Settings and at the bottom check the box Auto Generate to have the scene generating lighting automatically whenever you make changes to it.
2. RTS Engine Map Hierarchy
When you look at the Hierarchy tab in the editor, you can see that the RTS Engine has imported a couple of objects required to run the game.

The way the game objects are organized is not required to run the game issue-free. The hierarchy is setup in a way that offers an idea on how you can organize the game objects of your map scene. We will now go through these objects and introduce them briefly:
- GameManager: This includes the Game Manager component, which is the main component in this scene. When the scene starts, this is the first component that gets initialized and it is responsible for initializing the rest of components. This game object includes child objects that hold manager components. A manager component is one that is responsible for handling a specific aspect of the game. These manager components are grouped into sub-child objects depending on the aspect they handle. By default, they are categorized into the following groups:
- Essential: Includes manager components that are necessary to run the game. Removing one of these components will cause issues so leave those in here!
- Modules: Includes manager components that are optional and which can be removed and the game would still function. You can browse these manager components and you should be able to figure out what aspect of the game each of them handles.
- Terrain: This game object includes the basic plane-based terrain that you see in the scene view.
- ResourcesEntities: This object presents the parent of the pre-placed resource objects that you'll have in the map, i.e. the resources that are not created during runtime. We will go back to this when we discuss resources more in depth.
- FactionsEntities: This game object includes the faction entities (in our case at the moment, only just building and unit) that are not created during run-time but with which the game starts.
3. Game Manager
The Game Manager component includes global configurations for the game.
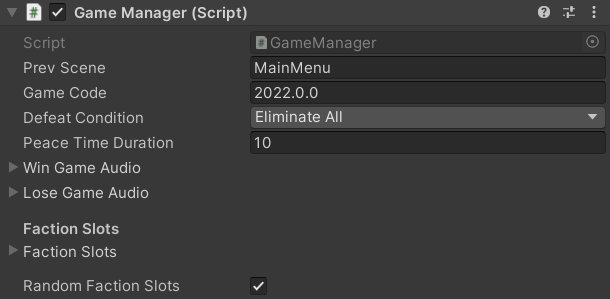
- Prev Scene: Name of the previous to load when leaving the game, after it starts directly in this map scene. Else, this field is not relevant if a lobby system loaded the map scene as the value assigned to it will be overwritten by the lobby system.
- Game Code: Code that identifies the game version/type of the map scene. This code is important when it comes to loading map scene from a lobby menu or querying saved game files from a specific game version.
- Defeat Condition: Determines when a faction becomes defeated in the game. You have the following options to pick from:
- Eliminate All: All active faction entities (units and buildings) of a faction must be destroyed for the faction to be defeated.
- Eliminate Main: When the main entities of a faction are destroyed, it is marked as defeated. The main faction entities can be set for each faction through the Unit, Building or Resource Building component inspector. This allows to setup game modes where a faction must protect a specific building like a capital city for example.
- Custom: The faction defeat must be called through accessing the RTS Engine API from your own components. This is done by calling the OnFactionDefeated method from the game manager and inputting the faction's ID as a parameter.
- Peace Time Duration: After the game starts, this is the time (in seconds) before factions are allowed to attack each other.
- Win Game Audio: Audio clip played when the local player's faction wins the game.
- Lose Game Audio: Audio clip played when the local player's faction loses the game.
- Faction Slots: Define the faction that can play in this map alongside their initial units and buildings that they start with. This is explored in more details in a following section.
- Random Faction Slots: When enabled and when loading this map from a lobby menu scene then this field would randomize the faction slots order in the Faction Slots array field above so that the slot ID that the local player gets is different each time. This is useful when you want the player's faction to start at different areas of the map each time they load up the game.
4. Test The New Map
Please make sure to go to the top menu bar in the editor and select RTS Engine -> Configure Demo Layers to import the demo layers.
The RTS Engine relies on using layers to define and differentiate certain objects. Some of these layers are defined in the RTS Engine manager components so you can change them later. However, for now, importing the demo layer will allow you to run the new map issue-free.
Now that you have an idea of how the game objects are organized in the scene. Go ahead and hit play and you should be seeing the following:

You can go ahead and select the building, whose model is a simple cube, or the unit, whose model is a simple capsule and you would be able to see some information regarding the faction entities that you select in the UI elements.

However, notice that when you try to move the unit, while having it selected, to a point in the terrain, nothing happens and the unit does not respond. This is because we have yet to bake the navigation mesh required for pathfinding. We will do this and handle setting up the terrain settings in the next tutorial where we setup the terrain.
Download Files
You can download the results of this tutorial here.