Mirror Multiplayer Module
Using Mirror Networking, this module allows to setup multiplayer lobbies and games with the RTS Engine.
Features
- Online and LAN multiplayer support.
- Start a multiplayer server in headless mode to setup an authoritative server.
- Multiplayer lobbies where a host has authority to pick the map, game configurations and kick other clients.
- Syncing the game state via lockstep where only inputs from the players are sent to the server, processed and then returned back to the clients in the same order leading to less bandwidth usage.
- Handle cases such as clients lagging behind in their local simulation or clients timing out.
- Option to dynamically update the lockstep duration to fit the low or high network latency of the clients in a game.
- Support for NPC factions in multiplayer games.
Requirements
- RTS Engine 2022.0.0 or higher
- Mirror 35.1.0 or higher
Installation
- Import the RTS Engine (or back up your project if you already have it imported).
- Download Mirror Networking and import it into your project.
- Get the Mirror Multiplayer Module and import it into your project.
Guide
1. Main Multiplayer Menu
Load up the scene MainMultiplayerMenu_Mirror in the path: RTS Engine -> Modules -> Multiplayer -> Mirror -> Scenes.
This scene includes the required components from Mirror to start or join a multiplayer lobby and eventually, a multiplayer game.
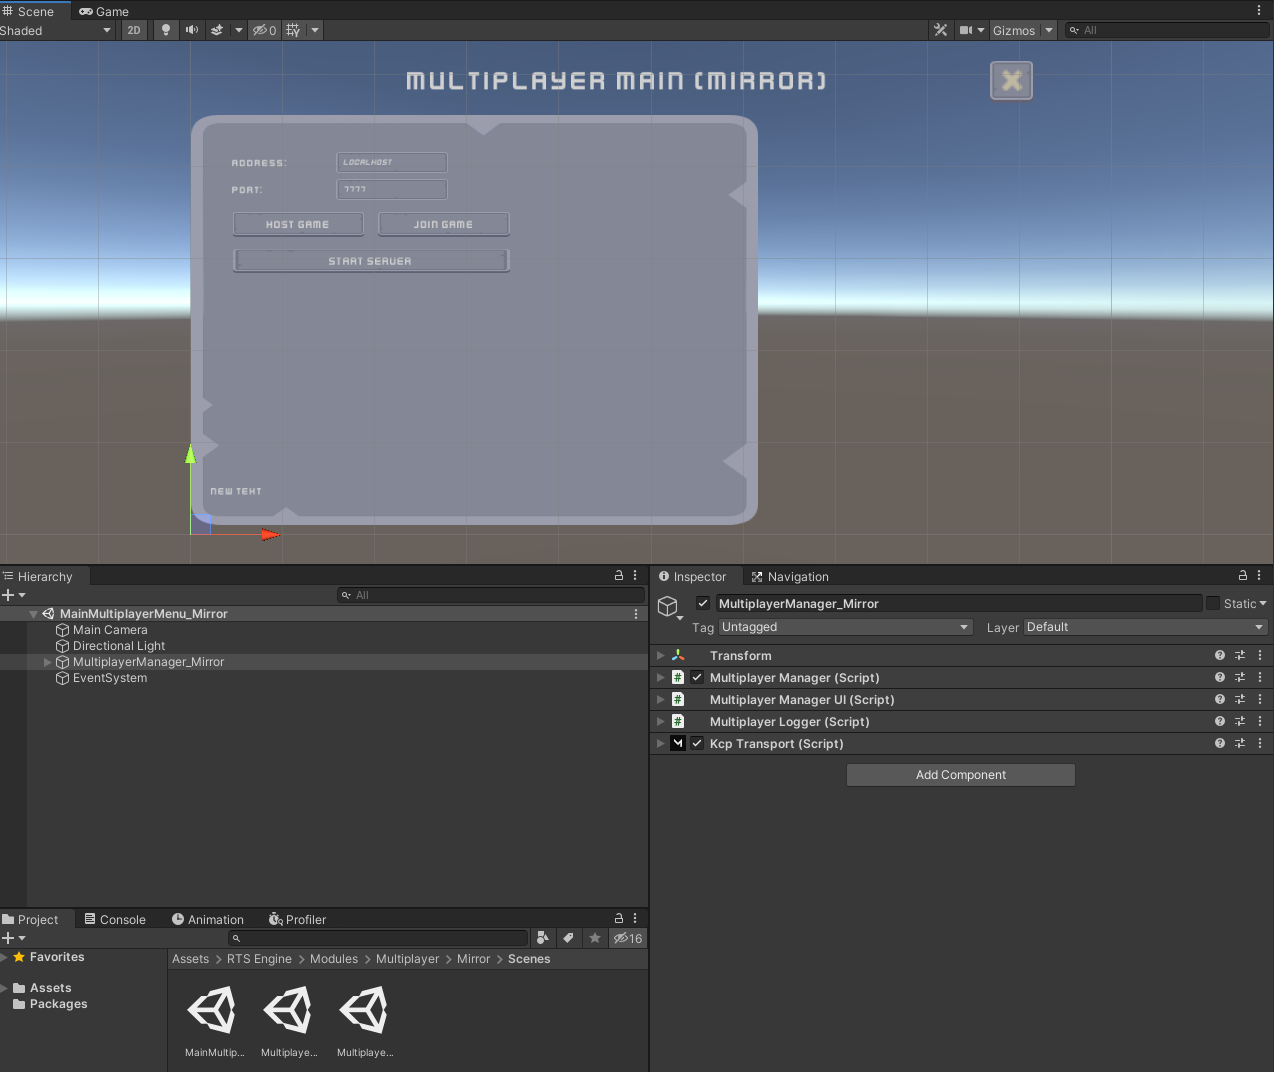
The main object in this scene is the MultiplayerManager_Mirror object which includes the following components.
1.1 Multiplayer Manager
The Multiplayer Manager component extends the default network lobby manager component that comes with Mirror. Only fields that are relevant to the RTS Engine will be discussed here. You can refer to the Mirror’s documentation page regarding this component for more information about the rest of the fields.
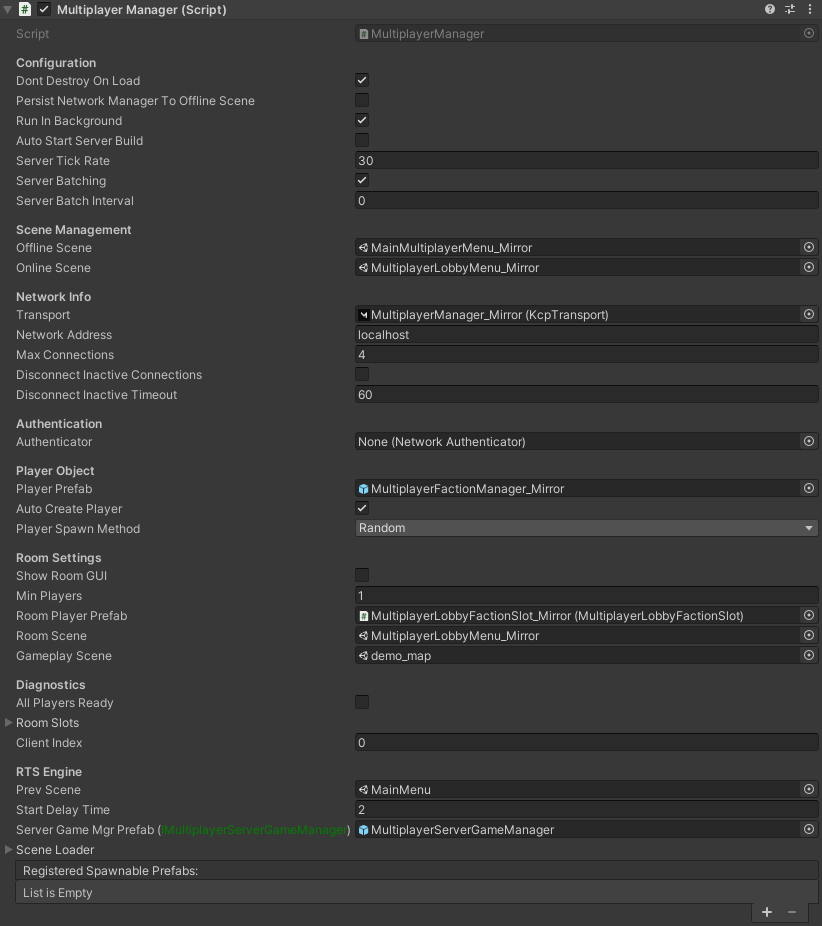
Configuration:
- Dont Destroy On Load: Make sure this field is enabled.
- Run In Background: Make sure this field is enabled.
- Auto Start Server Build: Make sure this field is disabled.
Scene Management:
- Offline Scene: Add this same scene to the field. Make sure it is added to your project's build settings.
- Online Scene: Add the multiplayer lobby scene to this field. Make sure it is added to your project's build settings. We will get to this scene shortly.
Network Info:
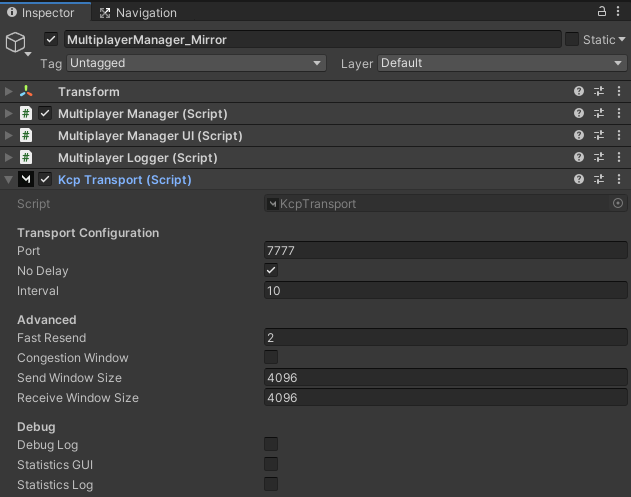
Transport: Make sure that you have one of Mirror's components attached to the same game object and assigned to this field. In this example, we are using Mirror's default KCP Transport. The relevant field in this component here is the Port field which represents the default port that the multiplayer menu will start with.
Player Object:
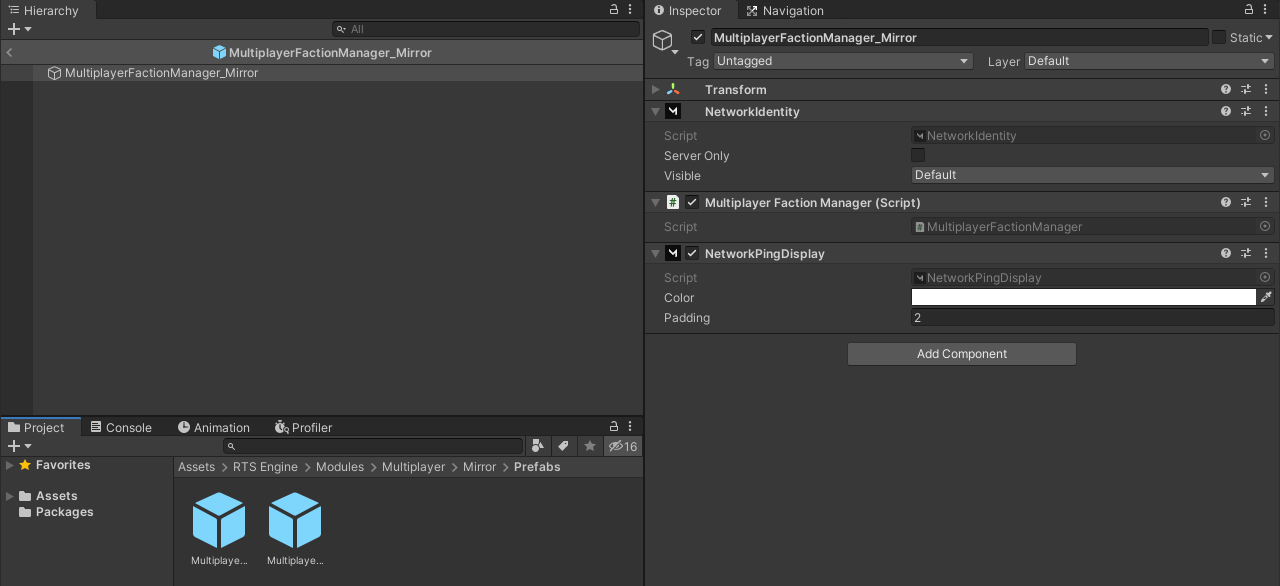
- Player Prefab: An empty object prefab which includes the Multiplayer Faction Manager component. This prefab is instantiated for each player faction when the map scene is loaded to handle collecting inputs from each local player, send them to server for verification and run the commands it receives from the server. An example prefab can be found in the project tab in the following path: RTS Engine -> Modules -> Multiplayer -> Mirror -> Prefabs under the name MultiplayerFactionManager_Mirror. The prefab also includes the Network Identity component attached to it.
- Auto Create Player: Make sure this option is enabled.
- Player Prefab: An empty object prefab which includes the Multiplayer Faction Manager component. This prefab is instantiated for each player faction when the map scene is loaded to handle collecting inputs from each local player, send them to server for verification and run the commands it receives from the server. An example prefab can be found in the project tab in the following path: RTS Engine -> Modules -> Multiplayer -> Mirror -> Prefabs under the name MultiplayerFactionManager_Mirror. The prefab also includes the Network Identity component attached to it.
Room Settings:
Show Room GUI: Make sure this field is disabled.
Min Players: Have it assigned to 1. You can also change the value on this field depending on your game's needs.
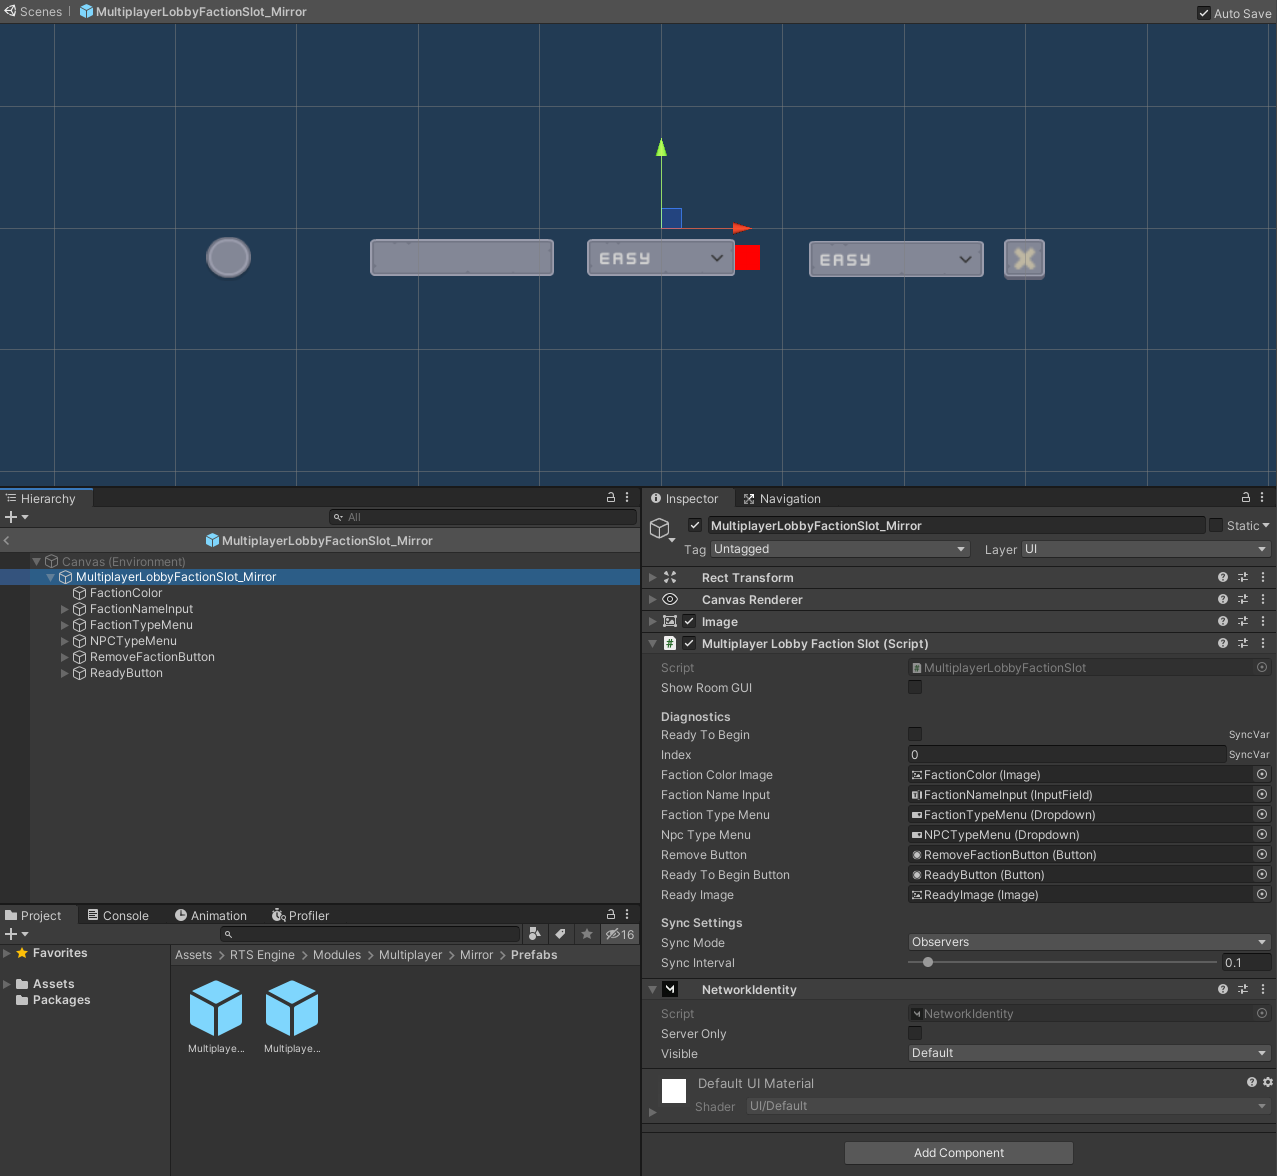
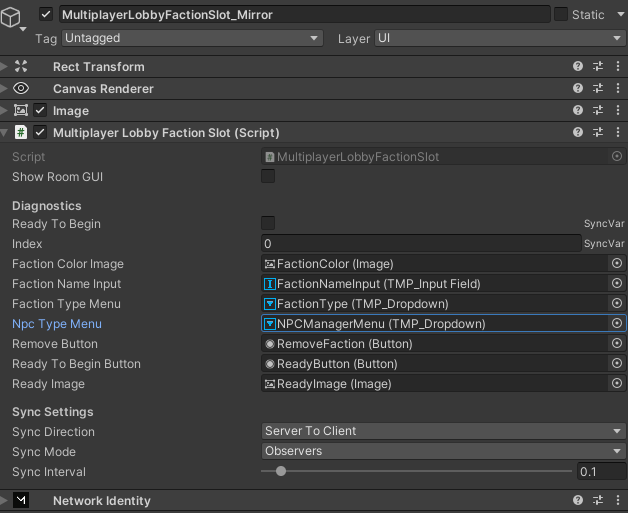
Room Player Prefab: A prefab which includes the Multiplayer Lobby Faction Slot component. This prefab is instantiated for each client that connects to the lobby menu to represent their faction slot. Each local player is only allowed to modify the configurations of their lobby faction slot. An example prefab can be found in the project tab in the following path: RTS Engine -> Modules -> Multiplayer -> Mirror -> Prefabs under the name MultiplayerLobbyFactionSlot_Mirror. The prefab also includes the Network Identity component attached to it. We will now explore the structure of this prefab and the fields in the Multiplayer Lobby Faction Slot component.
- Show Room GUI: Make sure this field is disabled.
- Ready To Begin: Have this field disabled by default. The lobby's host is only allowed to start the game and load the target map scene if all clients in the lobby have marked themselves as ready. Therefore, we want every client that comes to the lobby to start as not ready, configure their faction details and then mark themselves as ready.
- Index: Keep the default value of 0.
- Faction Color Image: UI Button that is used to display the faction’s color. In the On Click event of the Button component, drag and drop the prefab object as the event source and set the event to MultiplayerLobbyFactionSlot -> OnFactionColorUpdated.
- Faction Name Input: UI Input field that is used to input and show the faction’s name. In the On End Edit event of the InputField component, drag and drop the prefab object as the event source and set the event to MultiplayerLobbyFactionSlot -> OnFactionNameUpdated.
- Faction Type Menu: UI Dropdown which allows the player to pick a faction type to play with in the multiplayer game. In the On Value Changed event of the Dropdown component, drag and drop the prefab object as the event source and set the event to MultiplayerLobbyFactionSlot -> OnFactionTypeUpdated.
- NPC Type Menu: UI Dropdown which allows the lobby host to pick the NPC type of a NPC faction slot. In the On Value Changed event of the Dropdown component, drag and drop the prefab object as the event source and set the event to MultiplayerLobbyFactionSlot -> OnFactionTypeUpdated.
- Remove Button: UI Button that is only shown for the host and allows him to kick players from the lobby. In the On Clickevent of the Button component, drag and drop the prefab object as the event source and set the event to MultiplayerLobbyFactionSlot -> OnRemove.
- Ready To Begin Button: UI Button that is used to inform other players in the lobby that the local player is ready or not ready to start the game. The player joins the lobby as not ready and it is required for all players in the lobby to be ready to launch the game. In the On Click event of the Button component, drag and drop the prefab object as the event source and set the event to MultiplayerLobbyFactionSlot -> ToggleReadyStatus.
- Ready Image: UI Image that is shown when the player is ready and hidden when he’s not.
Room Scene: Assign the multiplayer lobby scene. By default, this is the MultiplayerLobbyMenu_Mirror scene. Make sure it is added to the build settings.
Gameplay Scene: Assign any of the map scenes in this field. This field's value will change depending on the map that the host would pick in the lobby menu but it has to be initialized with a non-null value.
RTS Engine:
Prev Scene: The scene to load when leaving this menu not to enter a lobby.
Start Delay Time: Delay time (in seconds) after the host decides to launch the game.
Server Game Mgr Prefab: Prefab of the server game manager which gets spawned on the server instance only to run the lockstep simulation in the multiplayer game. The RTS Engine utilizes a lockstep simulation to run a multiplayer game where the game consists of lockstep turns (whose length depends on factors such as the RTTs of clients) where each client sends an input of an action they want to perform with an entity that belongs to their faction, the server collects and processes the received inputs from clients and at the end of each lockstep turn the server sends the processed inputs to all clients as commands to perform. Therefore, each client runs an independent simulation on their end based on the commands they send and receive to and from the server and the server instance has authority on processing the commands and verifying their authenticity. The default prefab can be found in the path: RTS Engine -> Modules -> Multiplayer -> Prefabs. The prefab is an empty game object that only has the Multiplayer Server Game Manager component. We will now go through the field of the latter component:
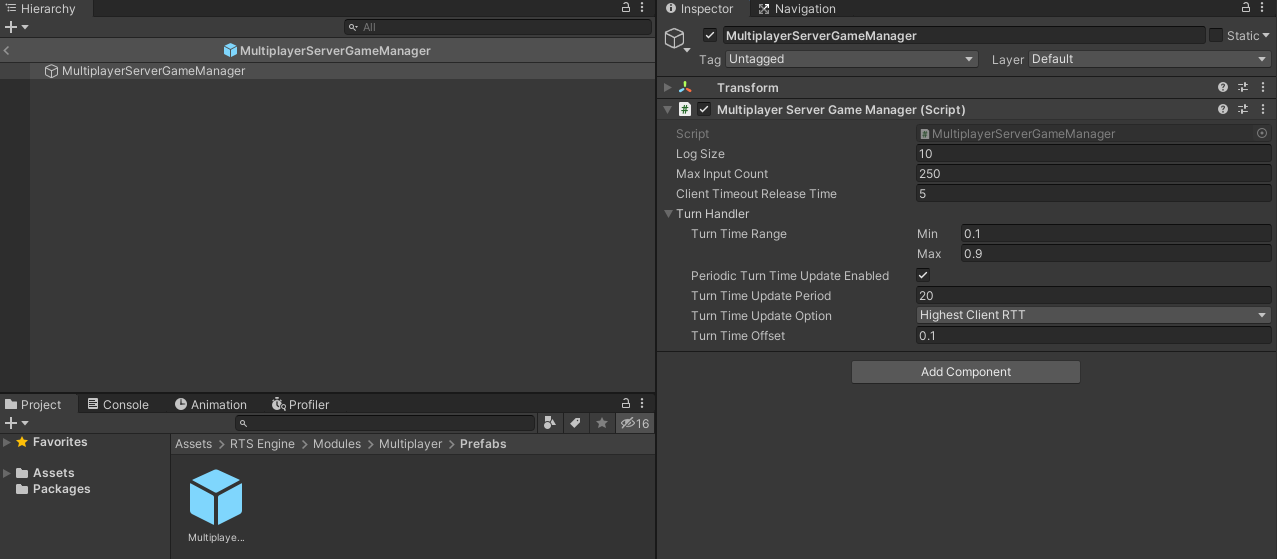
- Log Size: Maximum amount of input and RTT records that can be stored in the server tracker's cache per client. This is useful for the server to determine the lockstep turn length.
- Max Input Count: Maximum amount of input that are stored in the server tracker's log per client, per server turn.
- Client Timeout Release Time: When the simulation is paused, every client who has not caught up to the server's turn will be kicked. It is recommended that this value is higher than a couple lockstep turns.
- Turn Handler: Handles lockstep turns and updating the turn length based on clients response times.
- Turn Time Range: The allowed duration (in seconds) range that a turn can have. The server is able to adjust the turn time during the game depending on the latency of the clients but it will always keep it inside this range.
- Periodic Turn Time Update Enabled: Enable to allow the server to update the turn time every 'X' amount of turns based on the RTTs tracked from the game's clients.
- Turn Time Update Period: When the periodic turn time update is enabled, this is the amount of turns needed before an update occurs.
- Turn Time Update Option: When the turn time is initially set or updated during the game, either use the average of all clients' RTTs or focus on the client with the highest RTT?
- Turn Time Offset: Value added to the turn time after it is updated. Adding a small value after the turn time is computed using the clients' RTT values helps give a little extra time to keep all clients synced while avoiding frequent freezes.
Scene Loader: Defines properties regarding loading target map scenes. When the Load Async field is enabled, the target map scene would load in an asynchronous way. The On Scene Load Start Unity event is called when the scene loading starts. For example, when the loading is done asynchronously, you can use the former event to show a loading screen while the target map scene is loading.
1.2 Multiplayer UI Manager
The Multiplayer UI Manager component handles the UI side of the multiplayer menu.
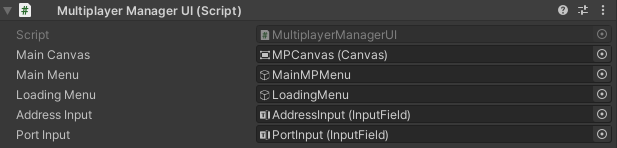
- Main Canvas: Canvas that has all of the UI elements as its child objects.
- Main Menu: UI Panel that represents the main menu where the user is able to launch the lobby.
- Loading Menu: UI Panel that represents the loading menu to the lobby menu.
- Address Input: UI Input Field used to allow the player to input the network address of their target lobby. In the On End Edit event of the Input Field component, drag and drop the object holding the UI manager component as the event source and set the event to MultiplayerUIManager -> OnServerAccessDataChange.
- Port Input: UI Input Field used to allow the player to input the port of their target lobby. In the On End Edit event of the Input Field component, drag and drop the object holding the UI manager component as the event source and set the event to MultiplayerUIManager -> OnServerAccessDataChange.
Other UI elements include the following three buttons:
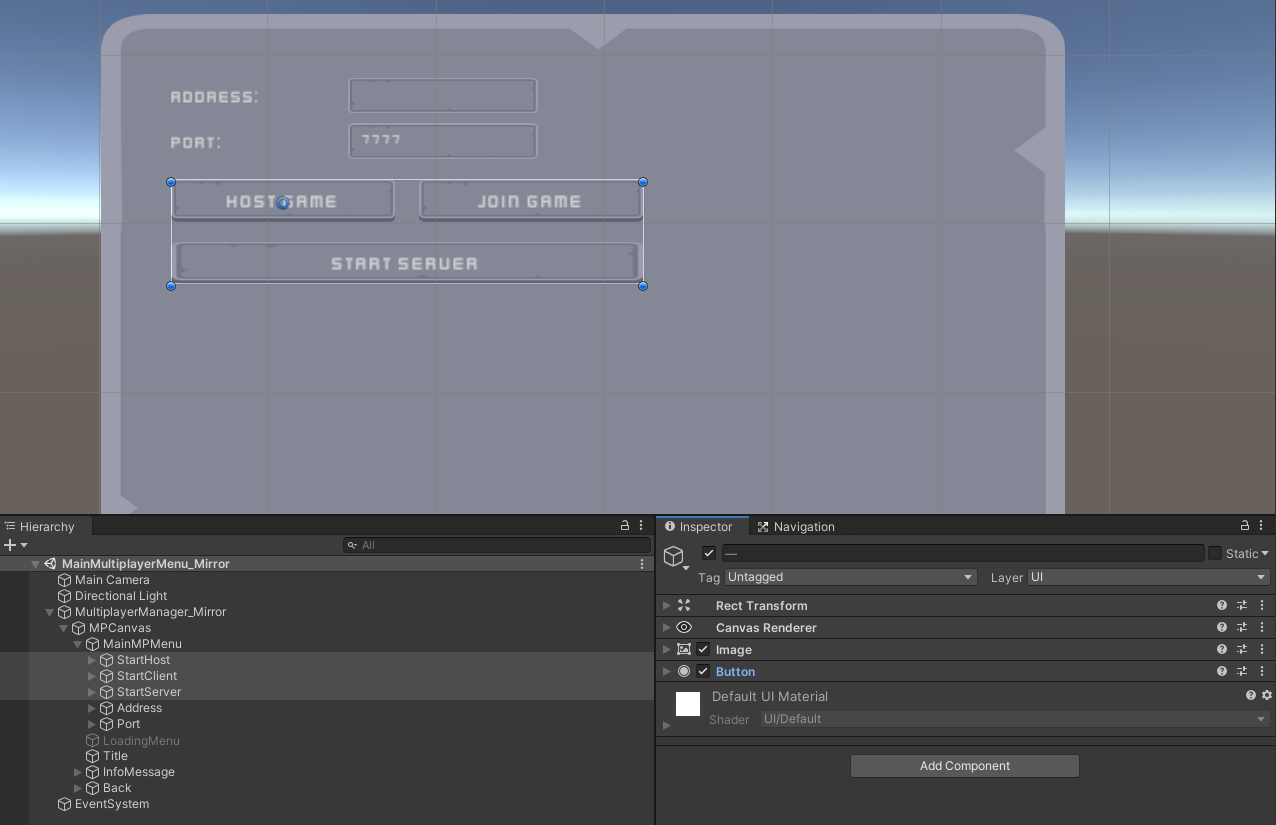
- Start Host: In the On Click event of the Button component, drag and drop the object that includes the Multiplayer Manager component as the event source and set the event to MultiplayerManager -> LaunchHost.
- Start Client: In the On Click event of the Button component, drag and drop the object that includes the Multiplayer Manager component as the event source and set the event to MultiplayerManager -> LaunchClient.
- Start Server: In the On Click event of the Button component, drag and drop the object that includes the Multiplayer Manager component as the event source and set the event to MultiplayerManager -> LaunchServer.
1.3 Other Local Lobby Manager Components
- Multiplayer Logger: Required to print log statements in the multiplayer menu.
- Multiplayer Audio Manager: Handles playing audio clips and music in the multiplayer menu.
- Multiplayer Player Message UI Handler: Handles displaying messages to the player in the multiplayer menu.
2. Multiplayer Lobby Menu
The multiplayer lobby menu requires to have its own scene that is loaded from main multiplayer menu when the player decides to start or join a lobby.
Load up the scene MultiplayerLobbyMenu_Mirror in the path: RTS Engine -> Modules -> Multiplayer -> Mirror -> Scenes.
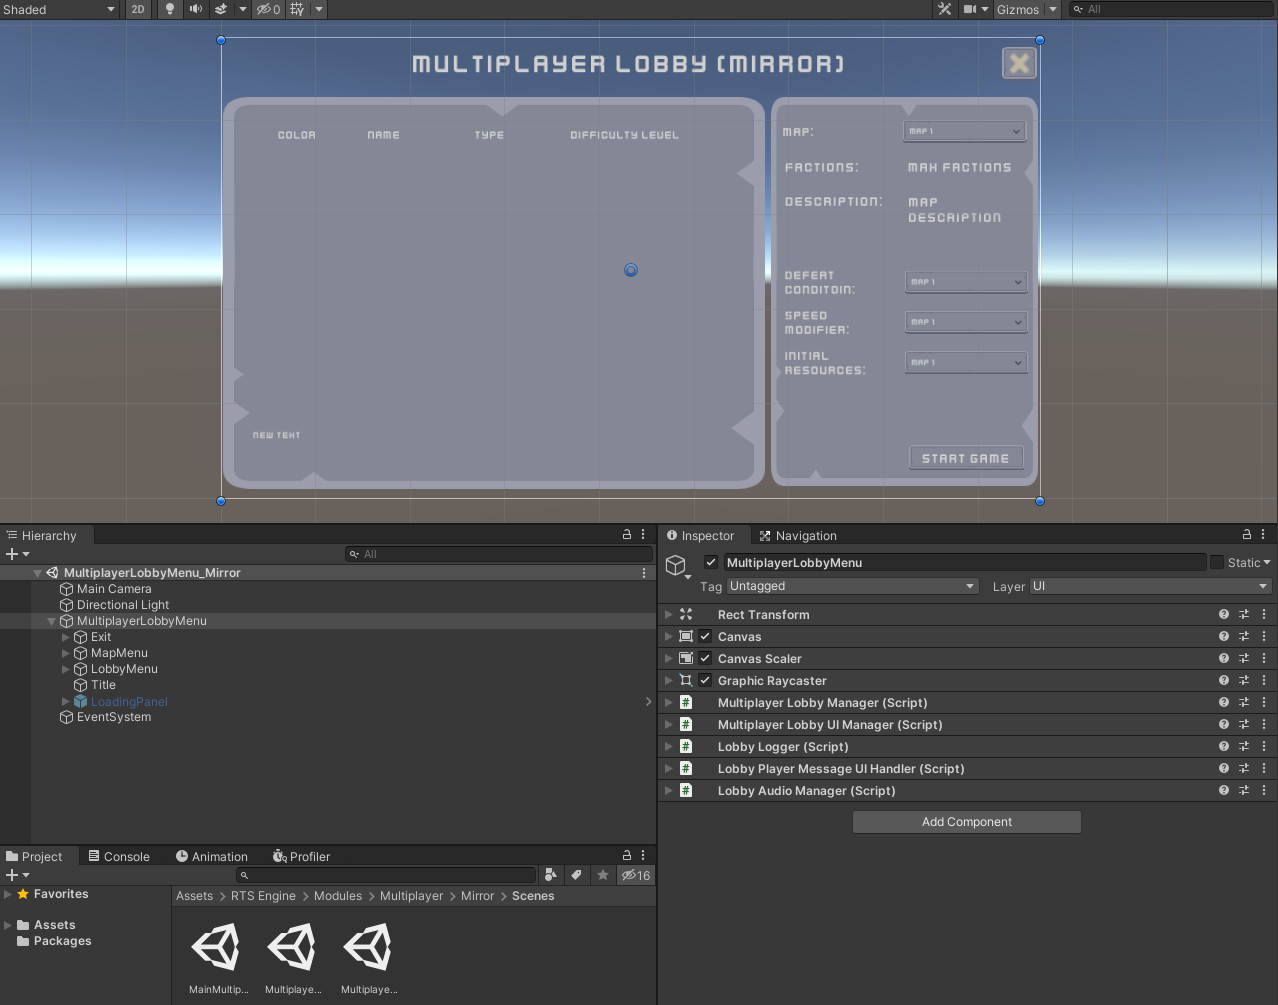
This scene comes with a menu that allows pick a target map and more configurations to setup a multiplayer game. The host (player that started the lobby) is the only client allowed to change the settings of the game (target map, initial resources, etc..) while other clients can join the lobby and just configure their faction slot's data, mark themselves ready and wait for the host to actually start the game once all clients in the lobby are ready.
The main object in this scene is the MultiplayerLobbyMenu UI canvas. This holds all the UI elements necessary to construct the lobby menu as children objects as well as the components required to run the lobby and connect with the RTS Engine.
Select the MultiplayerLobbyMenu object and let's explore the components it has attached to it.
2.1 Multiplayer Lobby Manager
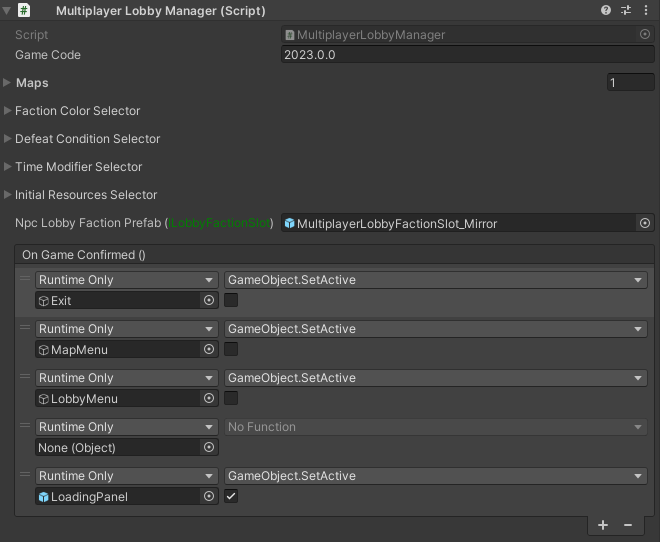
Game Code: Enter the game's version in this field. It represents the version of your that the lobby is running. When a player starts a lobby, the lobby requires all other clients that would join to have the same game code/version as the host. Any client that connects with a different game code/version will be immediately kicked from the lobby.
Maps: This array field allows to input the available maps that the host can choose from for the game. For each map, add an element to this field and pick the following:

- Scene Name: The name of the target map scene. Make sure it is added in the build settings of your project.
- Name: Name to be displayed on UI elements in the lobby.
- Description: Short description of the map scene to display in the UI elements of the lobby.
- Factions Amount: Pick the minimum and the maximum amount of faction slots allowed to play in the map. Make sure that the amount of maximum faction slots matches the faction slots you defined in the Game Manager component in the map scene.
- Faction Types: Input the Faction Types that factions can use in the map.
- NPC Types: Input the NPC Types that NPC factions can use in the map.
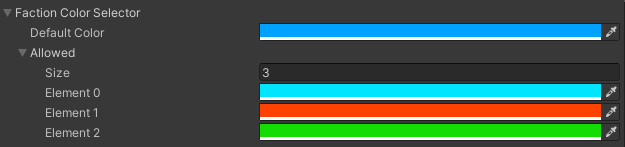
Faction Color Selector: Pick a default color and a list of allowed faction colors that each local player can pick for their faction.
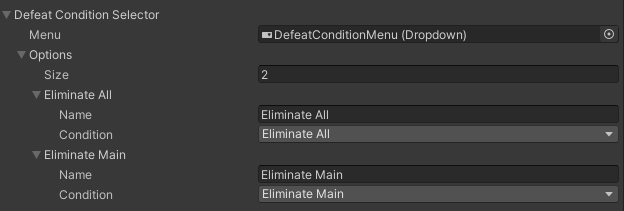
Defeat Condition Selector: Define the conditions that marks a faction as defeated in the map and define a name that will be shown in the lobby UI menus that corresponds to each possible defeat condition.
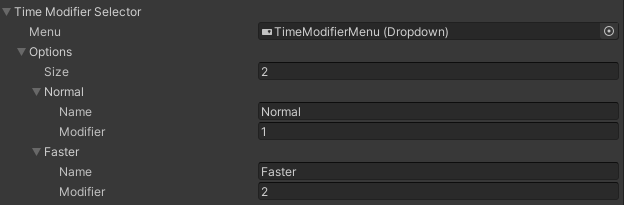
Time Modifier Selector: Pick options for the speed that the game in the map can start with. The value of 1 represents a normal speed, while anything higher renders the game faster and anything lower renders it slower. This does not affect Unity's time scale but rather only RTS Engine related components.
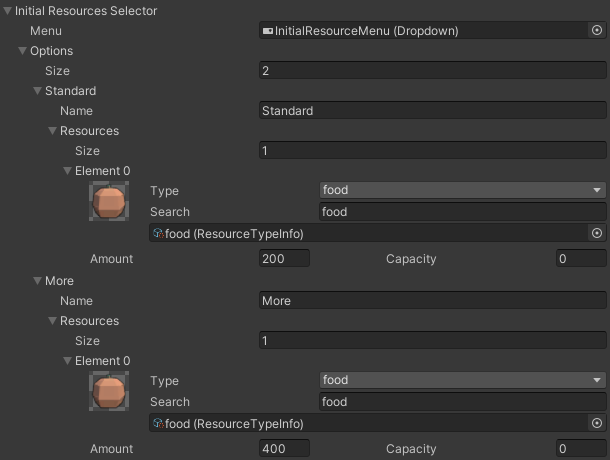
Initial Resources Selector: Define options of resource types and corresponding amounts/capacities that the host player can pick from for factions to start the map with.
NPC Lobby Faction Prefab: A prefab which includes the Multiplayer Lobby Faction Slot component.This prefab has the same structure as the Room Player Prefab assigned in the Multiplayer Manager. Only the host player is allowed to add NPC faction slots to a multiplayer game lobby and only they are allowed to set the color, name, faction type and NPC type of the NPC faction slot which will then get synced to all other clients in the lobby. When the host leaves, all the NPC faction slots are removed and the new host is then able to add NPC factions slots to the lobby. When the game starts and the host player leaves, the NPC factions are not removed and they continue being available as long as the game keeps going (as long as the host player is not also the instance that is running the server). Just make sure that the NPC Type Menu field is assgined here so that the lobby master can set its NPC Type. An example prefab can be found in the project tab in the following path: RTS Engine -> Modules -> Multiplayer -> Mirror -> Prefabs under the name MultiplayerLobbyFactionSlot_Mirror. MultiplayerLobbyFactionSlot_Mirror. The prefab also includes the Network Identity component attached to it. Please refer to the Room Player Prefab field in the Multiplayer Manager in order to learn more about setting up this prefab.
- On Game Confirmed Event: Unity event invoked when the lobby start is confirmed by the server to start when the host starts the game when all clients in the lobby are marked as ready.
2.2 Multiplayer Lobby UI Manager
The Multiplayer Lobby UI Manager component is responsible for handling UI elements in a multiplayer lobby scene.
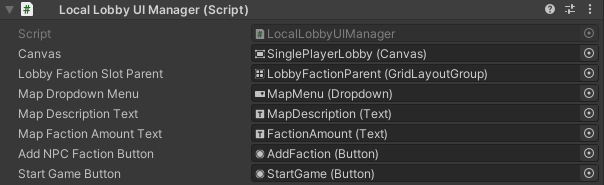
- Canvas: Main canvas that is the parent object of all lobby UI elements.
- Lobby Faction Slot Parent: Parent object of all the faction lobby slots objects. It must have a Grid Layout Group component attached to it.
- Map Dropdown Menu: UI Dropdown menu used to represent the maps that can be selected in the lobby. In the On Value Changed event of the Dropdown component, drag and drop the prefab object as the event source and set the event to LocalLobbyManagerUI -> OnLobbyGameDataUIUpdated
- Map Description Text: UI Text used to display the selected map's description.
- Map Faction Amount Text: UI Text used to display the selected map's min and max allowed faction amount.
- Add NPC Faction Button: UI Button used to add a NPC faction slot to the lobby.
- Start Game Button: UI Button used to start the game from the lobby. In the On Click event of the Button component, drag and drop the object that includes the prefab object the event source and set the event to LocalLobbyManagerUI -> StartLobby. This button is where the host of the lobby clicks to start the game but only when all other clients have marked themselves as ready.
Additional UI elements include the following map menu UI dropdown elements that are assigned in the selector fields of the Multiplayer Lobby Manager component.
For all of the dropdowns, in the On Click event of the Button component, drag and drop the object that includes the Multiplayer Lobby UI Manager component as the event source and set the event to MultiplayerLobbyUIManager -> OnLobbyGameDataUIUpdated.
2.3 Other Multiplayer Lobby Manager Components
- Lobby Logger: Required to print log statements in the lobby menu.
- Lobby Audio Manager: Handles playing audio clips and music in the lobby menu.
- Lobby Player Message UI Handler: Handles displaying messages to the player in the lobby menu.
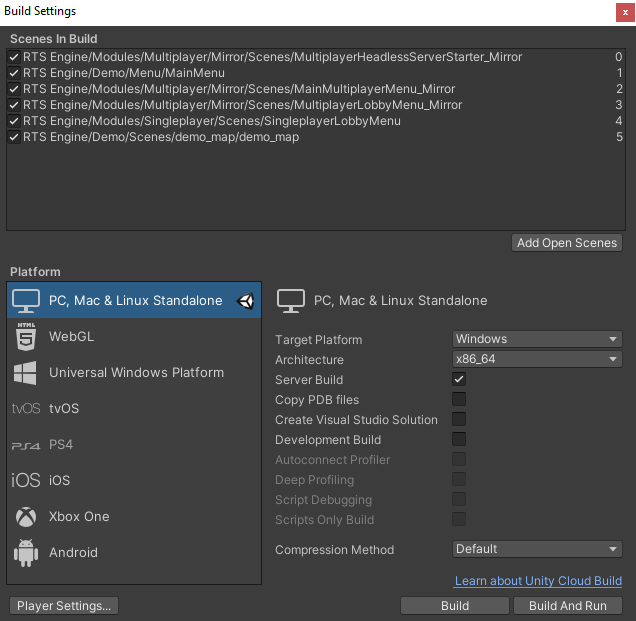
3. Headless Server Starter Scene
This module comes with the option of building a server build to start a headless server that clients can use to host or join lobbies. To achieve this, open the MultiplayerHeadlessServerStarter_Mirror scene in the path: RTS Engine -> Modules -> Multiplayer -> Mirror -> Scenes.
The scene only has one empty object that has the Multiplayer Server Manager with the following fields:
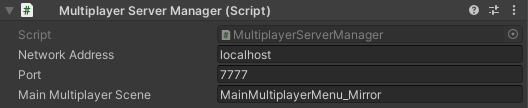
- Network Address: Address that the server will start with. This is usually left to localhost.
- Port: The port that the server will start with.
- Main Multiplayer Scene: Scene that contains the main multiplayer components that use this component to automatically start the server.
Finally, make sure that this scene is the first scene in the build settings and that Server Build is enabled when building the headless server instance.
Changelog
v2022.0.0
Release Date: 03/01/2022
Requirements
- RTS Engine 2022.0.0 or higher
Mirror 35.1.0 or higher
Changes
Initial Release
v2022.1.1
Release Date: 03/17/2022
Requirements
- RTS Engine 2022.0.0 or higher
Mirror 65.0.0 or higher
Changes
UPDATE obsolote overridable methods of Mirror's NetworkRoomManager in the MultiplayerManager component.
v2022.2.3
Release Date: 07/30/2022
Requirements
- RTS Engine 2022.2.3 or higher
Mirror 65.0.0 or higher
Changes
ADD the option in the lobby menu to pick a random faction type for a faction slot which allow the faction to have a random faction type of the ones specified in the currently selected map.
v2022.3.2
Release Date 01/24/2023
Requirements
- RTS Engine 2022.3.2 or higher
Mirror 71.0.0 or higher
Changes
FIX an error that appears when you leave a multiplayer lobby.
v2023.0.0
Release Date 05/10/2023
Requirements
- RTS Engine 2023.0.0 or higher
Mirror 71.0.0 or higher
Changes
REMOVE legacy code handling for Mirror integration package.
- UPDATE the multiplayer game lobby to deny new clients when they join and the lobby has reached the maximum faction slots count for the current selected map.
- ADD support for NPC faction slots in multiplayer games.
- UPDATE all UI related components to use TextMeshPro instead of Unity Text.
v2023.0.1
Release Date 06/27/2023
Requirements
- RTS Engine 2023.0.1 or higher
Mirror 79.0.1 or higher
Changes
FIX handling the situation where a network address and port is already used and a player attempts to start host or start server using that same network address and port.
- FIX freezing a multiplayer game when it starts while waiting for all clients to connect so that no client can bypass the initial freeze and send input to the server before all clients connect.
v2023.0.2
Release Date 09/25/2023
Requirements
- RTS Engine 2023.0.2 or higher
Mirror 79.0.1 or higher
Changes
UPDATE the MultiplayerServerGameManager script to share the RTT (ping) of each client with all clients during each lockstep of the game.
- UPDATE some non game breaking logged errors in the MultiplayerServerGameManager component to simple warnings, since they are not, by their nature, game/simulation breaking but important enough to be logged as warnings.
- ADD "Max Awaiting Receipt Turns" field to the MultiplayerServerGameManager component where you can specify how many consecutive turns have to pass while the server is waiting for all clients to confirm that they received the last relayed inputs before the server freezes the game. The minimum is 1.
- ADD player and logger messages that track the progress of having individual clients/factions being validated when the game is starting and is being frozen until all clients connect and the game is unfrozen and ready to start.
v2023.0.3
Release Date 10/09/2023
Requirements
- RTS Engine 2023.0.3 or higher
Mirror 79.0.1 or higher
Changes
UPDATE lobby game maps to include a field list of faction types for each map with each faction type having a field list that defines the allowed NCP types to be played by that faction type. The random faction type now also has its own separate NPC types.
v2023.0.4
Release Date 11/05/2023
Requirements
- RTS Engine 2023.0.4 or higher
Mirror 79.0.1 or higher
Changes
FIX a bug where after a client leaves a multiplayer game, the server still tries to send inputs to them.
- FIX a bug that prevents all client validation message to be sent to all clients in case of a dedicated server.
- UPDATE the TurnHandler to calculate the tick rate using the Update function instead of a coroutine.
- UPDATE multiplayer health command handling to only be triggered from the authoritative master instance instead of from clients.
- ADD the option to prevent the turn time from changing during the lifetime of a multiplayer game.
v2024.0.0
Release Date 06/01/2024
Requirements
- RTS Engine 2024.0.0 or higher
Mirror 79.0.1 or higher
Changes
FIX a bug that disallows a client in a multiplayer game to not be allowed to send their player issued commands to the server.
- FIX a bug that disallows all clients from sending their player issued commands when running the game on a headless server instance.