Main Camera Controller
Start by creating a new scene and configuring it as a RTS Engine map scene using the RTS Engine top bar menu. Then bake the navigation mesh and generate lightning in the scene. Our scene is now ready.
The following assumes that your main camera uses a Perspective projection mode. In case you are using an Orthographic projection mode, please refer to the last paragraph for the changes you need to apply to your scene.
The following camera setup also assumes that you are using SRP. For URP, there are some modifications you need to apply to the camera stack which you can find it in the Setup URP guide.
1. Main Camera Structure
In the scene hierarchy navigate to GameManager -> Cameras.
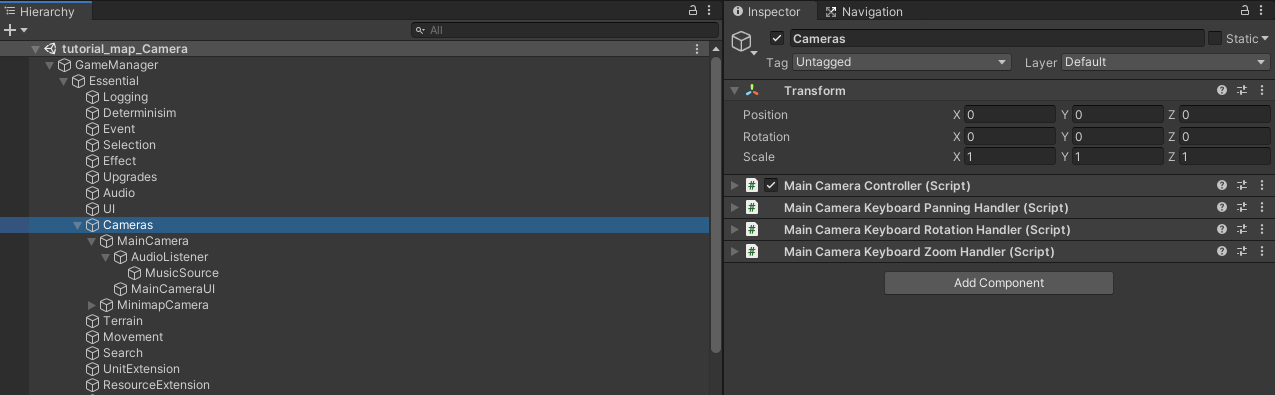
The Cameras game object holds the essential camera controller related components and its children objects include the actual camera objects. In this guide, we will only focus on the main camera and not the minimap camera.
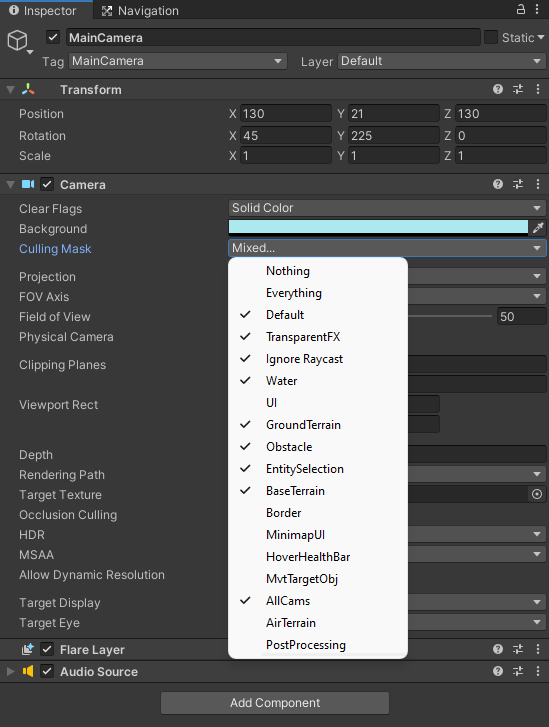
MainCamera game object: This includes Unity's Camera component, the Flare layer and an Audio Source by default. The Audio Source component is used as the global SFX audio source where global audio effects are played. It has a Perspective Projection and its culling Mask includes all layers except for the UI elements which have a dedicated camera to render them.
Audio Listener game object: A child object of MainCamera, it includes only the Audio Listener as a component. It is placed by a distance in the forward direction of its parent MainCamera game object. It is used as the only audio listener component and its placement allows to listen to local audio effects played from entity game objects on the map terrain.
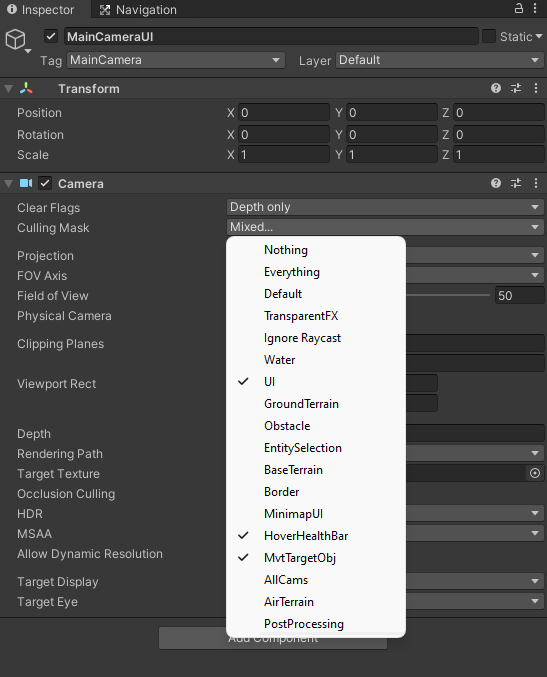
MainCameraUI game object: A child object of MainCamera. It has a Perspective Projection just like the MainCamera and is used to render UI elements only. Therefore its Culling Mask has the following layers:
- UI: Layer assigned to main UI elements (such as the task panel or selection panel).
- HoverHealthBar: Layer assigned to the UI elements representing the hover health bars that appear when you hover over entities.
- MvtTargetObj: Layer assigned to the prefab that is shown when you command local units to move a destination at the movement destination.
The reason we need a separate camera for rendering UI is to allow the UI elements to be rendered on top of the rest of the world in the map scene. Therefore the UI camera has a depth of 1, higher than the depth of the regular main camera which has a depth of 0. Make sure that both the MainCamera and MainCameraUI have the same field of view
2. Main Camera Controller
Now back to the Cameras game object to explore the components responsible for controlling the main camera's panning, rotation and zooming.
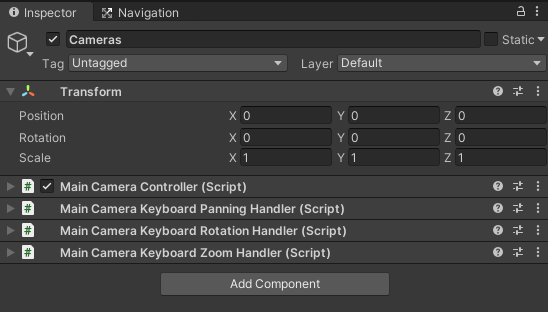
The Main Camera Controller is the main component for controlling the camera. It includes two fields where the MainCamera and MainCameraUI objects (explained above) are assigned. This component acts as a manager for the control handler components (panning, rotation and zooming by default) and allows them to communicate with each other.

2.1 Main Camera Keyboard Panning Handler
The Main Camera Keyboard Panning Handler component handles panning for the main camera using keyboard and mouse inputs.
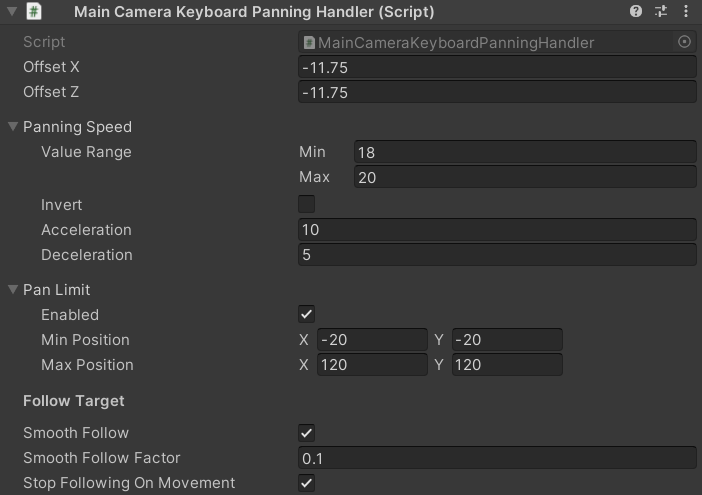
- Offset X/Z: Depending on the initial camera rotation (which is set in the rotation control handler), you need to set the offset accordingly on the X and Z axis. An initial rotation (with Euler angles) of (45, 45, 0) for example can have offset like the values shown in the inspector above while an initial rotation of (0, 90, 0) where the camera is looking straight down to the map scene allows the main camera to have 0 offset values.
- Panning Speed: The speed value is defined in the Value Range field where you can have a max and a min value. The current speed value depends on the current zoom level of the camera so the minimum panning speed is reached when the camera is at the lowest zoom level while the maximum panning speed is reached when the camera is at the maximum zoom level. The latter relationship between panning speed and the zoom level can be inverted by enabling the Invert field. The Acceleration and Deceleration field define how fast the spanning speed goes from 0 to the speed value when the player starts panning the camera and from the speed value to 0 when the player stops panning the camera.
- Pan Limit: Enable this field to define limitations on the minimum and maximum positions the main camera is allowed to have on the X and Z axis. (Value entered in the Y field represents the Z axis of the main camera).
- Follow Target: Options that determine how the main camera handles following entities or any other object in the map scene. Enabling Smooth Follow allows the camera follow process to be smoothed out and the Smooth Follow Factor determines how smooth the camera panning would be when following a target. When Stop Following On Movement is enabled then the camera will stop following is targeted when the user gives a panning a input to the main camera. There is a dedicated component that enables selected entities to be followed by the main camera and it is part of the Advanced Selection free module which comes pre-installed with the core installation of the RTS Engine.
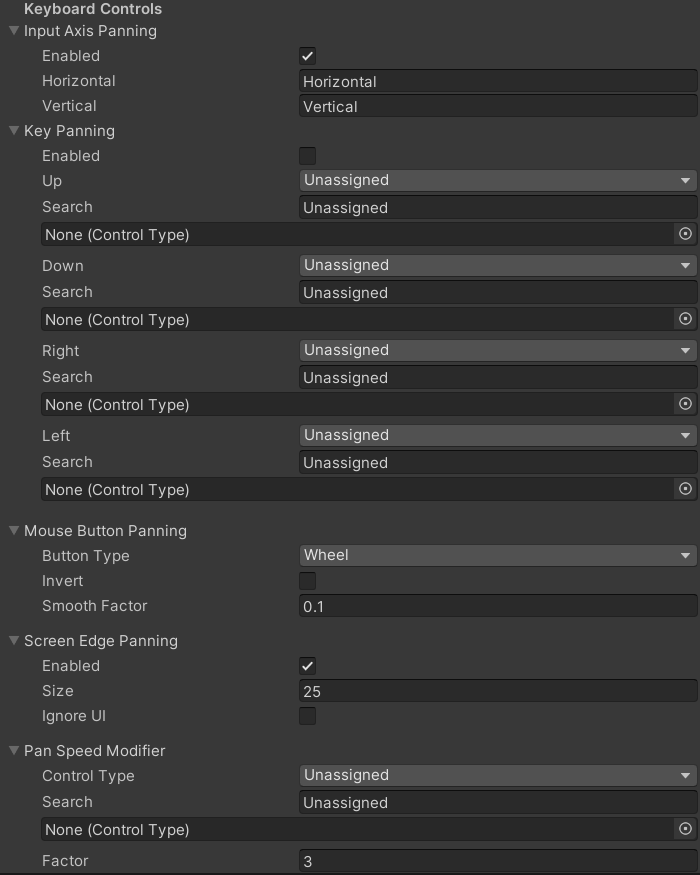
- Input Axis Panning: Using Unity's InputManager, you can enable movement using the axis defined there in this field.
- Key Panning: In this field, you can defined control types that when held, can pan the camera in all four possible directions.
- Mouse Button Panning: This fields allows to pan the camera while the player is holding down a mouse button that can be chosen in the Button Type field.
- Screen Edge Panning: This fields allows the camera to pan when the mouse cursor is on the edge of the screen within a certain range (Size field). You can also choose whether to enable or disable camera panning when the mouse cursor is over UI elements in the edge of the screen using the Ignore UI field.
- Pan Speed Modifier: When a Control Type is defined and held down, the panning speed is modified (multiplied) by the value defined in the Factor field.
2.2 Main Camera Keyboard Rotation Handler
The Main Camera Keyboard Rotation Handler component handles rotation for the main camera using keyboard and mouse inputs.
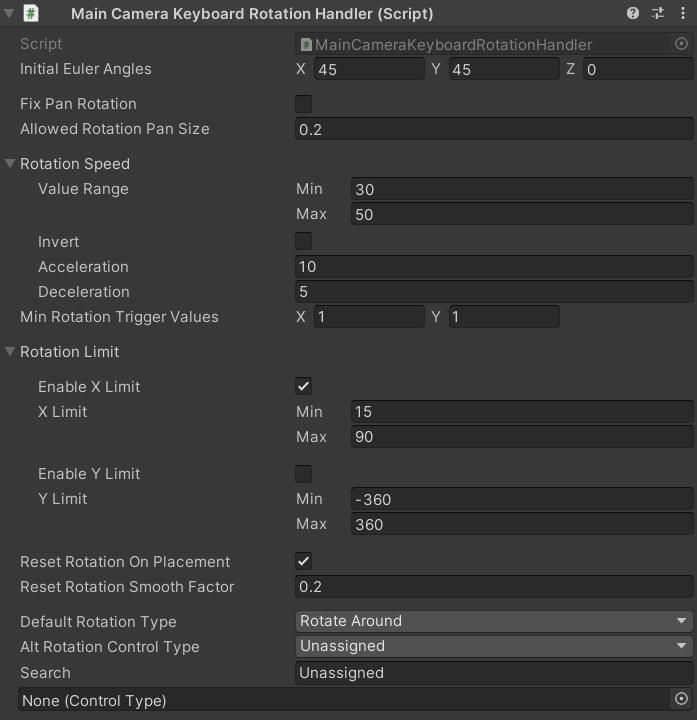
- Initial Euler Angles: The initial rotation of the main camera in Euler angles.
- Fix Pan Rotation: When enabled, the main camera rotation will always be reset to the initial chosen rotation whenever the camera pans. The Allowed Rotation Pan Size field determines the distance needed for panning by the main camera in order for the rotation to be reset.
- Rotation Speed: The speed value is defined in the Value Range field where you can have a max and a min value. The current speed value depends on the current zoom level of the camera so the minimum rotation speed is reached when the camera is at the lowest zoom level while the maximum rotation speed is reached when the camera is at the maximum zoom level. The latter relationship between rotation speed and the zoom level can be inverted by enabling the Invert field. The Acceleration and Deceleration field define how fast the rotation speed goes from 0 to the speed value when the player starts rotating the camera and from the speed value to 0 when the player stops rotating the camera.
- Min Rotation Trigger Values: Minimum rotation input value for an actual rotation to be executed. This allows to avoid small mouse movements of the right mouse button or the mouse wheel to trigger rotation. Values must be in [0,1) for both axis.
- Rotation Limit: What are the minimum and maximum Euler angles that the main camera is allowed to have on the X and Y axis.
- Reset Rotation On Placement: Reset camera rotation to initial values when placing a building? When enabled, player will not be allowed to rotate the camera as long as they are placing a building.
- Reset Rotation Smooth Factor: When resetting the rotation smoothly, this field defines how smooth the reset is.
- Default Rotation Type: Pick the default rotation mode. Free: rotate in any direction. Rotate Around: rotating the main camera will always occur by orbiting/rotating around the position that the camera is looking at.
- Alt(ernative) Rotation Control Type: When the control type is enabled, it allows to use the alternative rotation type that is not set as the default one.
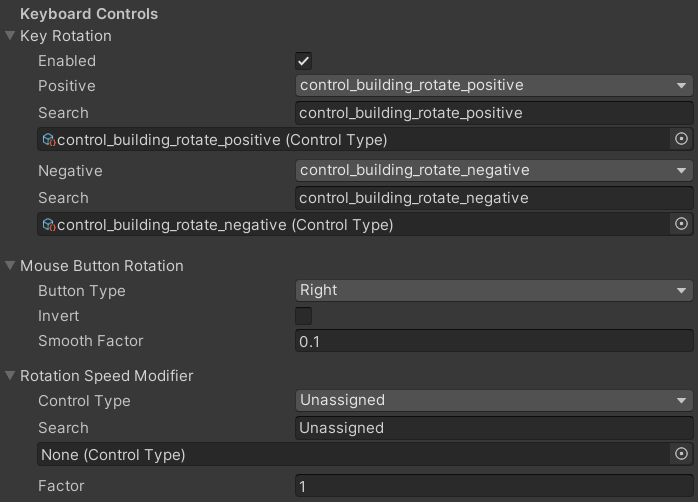
- Key Rotation: In this field, you can find control types that execute a rotation on the Y axis.
- Mouse Button Rotation: Enable this field to allow the player to rotate the main camera by holding a mouse button that can be defined in the Button Type field and then moving their mouse.
- Rotation Speed Modifier: When a Control Type is defined and held down, the rotation speed is modified (multiplied) by the value defined in the Factor field.
2.3 Main Camera Keyboard Zoom Handler
The Main Camera Keyboard Zoom Handler component handles zooming for the main camera using keyboard and mouse inputs.
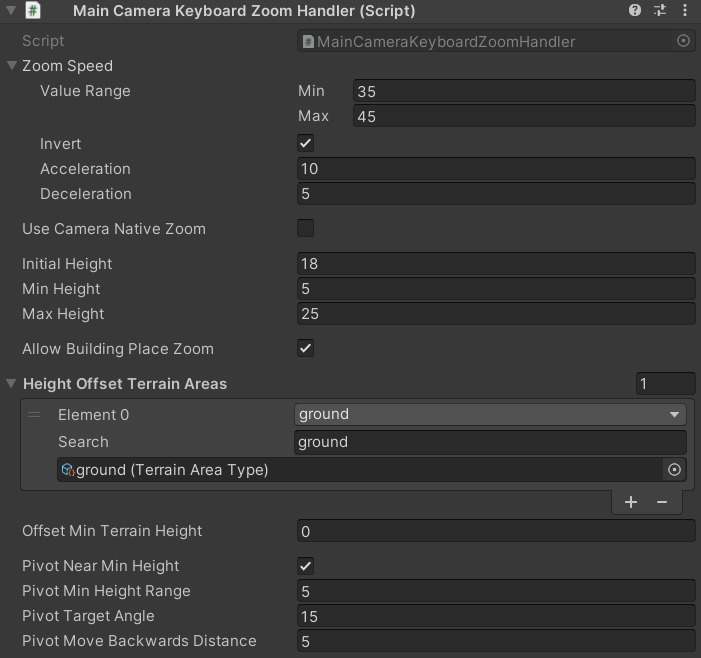
- Zoom Speed: The speed value is defined in the Value Range field where you can have a max and a min value. The current speed value depends on the current zoom level of the camera so the minimum zooming speed is reached when the camera is at the lowest zoom level while the maximum zooming speed is reached when the camera is at the maximum zoom level. The latter relationship between zooming speed and the zoom level can be inverted by enabling the Invert field. The Acceleration and Deceleration field define how fast the zooming speed goes from 0 to the speed value when the player starts zooming the camera and from the speed value to 0 when the player stops zooming the camera.
- Use Native Camera Zoom: Enable to zoom using the camera's field of view (FOV) in case of a perspective camera or the orthographic size in case of an orthographic projection mode instead of the height of the camera.
- Initial, Min and Max Height: Define the initial height (position of the camera on the Y axis) and the range the height the main camera is allowed to have using these fields. When using Native Camera Zooming then you should input the initial, minimum and maximum field of view (or orthographic size values) values the camera is allowed to have.
- Allow Building Place Zoom: Disable this field to not allow the player to zoom the main camera when placing buildings.
- Height Offset Terrain Areas: When the main camera is facing one of the terrain area types defined where the height of the terrain is above the value defined in the Offset Min Terrain Height field, this would trigger the main camera to offset its height so that it always stays above the terrain area with the same height. Leave this field unassigned to disable this feature.
- Pivot Near Min Height: Enable to allow the main camera to pivot upwards when reaching the minimum zoom height. This only works when zooming is enabled without adjusting the FOV of the camera and when the main camera is in its initial rotation values before pivoting starts!
- Pivot Min Height Range: Range before the mininum allowed height of the main camera in which pivoting upwards occurs if enabled.
- Pivot Target Angle: When pivoting upwards towards the minimum height is enabled, the camera will pivot smoothly towards this angle.
- Pivot Move Backwards Distance: When pivoting upwards towards the minimum height is enabled, the camera will slightly move backwards smoothly until it reaches the values in this field when the minimum height is reached.
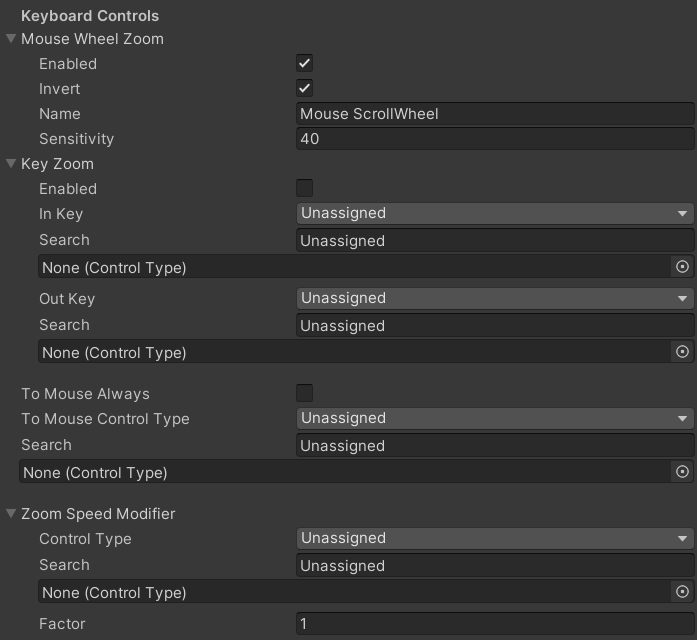
- Mouse Wheel Zoom: Enables zooming by scrolling the mouse wheel using the mouse wheel scroll axis from Unity's input manager. You can enable Invert to make the zooming inverted with the direction of the mouse wheel scroll and assign the Sensitivity of the mouse scroll wheel axis.
- Key Zoom: Enables zooming using keys defined via control types.
- Zoom To Mouse Always: Enable this option to make the camera zoom always to/from mouse position.
- Zoom To Mouse Control Type: Assign a control type in this field that when held down, the zooming occurs towards the current mouse position.
- Zoom Speed Modifier: When a Control Type is defined and held down, the zooming speed is modified (multiplied) by the value defined in the Factor field.
3. Orthographic Camera
Make sure that you have the following in your map scene:
- Both the main camera and the UI main camera (in case you are using one) must have the same orthographic projection mode.
- In the TerrainManager inspector, reset the Camera Boundaries To Base Terrain Position field to 0 on both the upper and bottom margin.
- In the Zoom Handler, you can not have zooming based on the camera's world position height. Instead, you can only have zooming using the orthographic projection size of the camera. Therefore, make sure to enable the Use Native Camera Zoom field and set the Initial, Min and Max height fields accordingly.
- You might need to adjust the Z and X camera position offset values in the Panning Handler.